
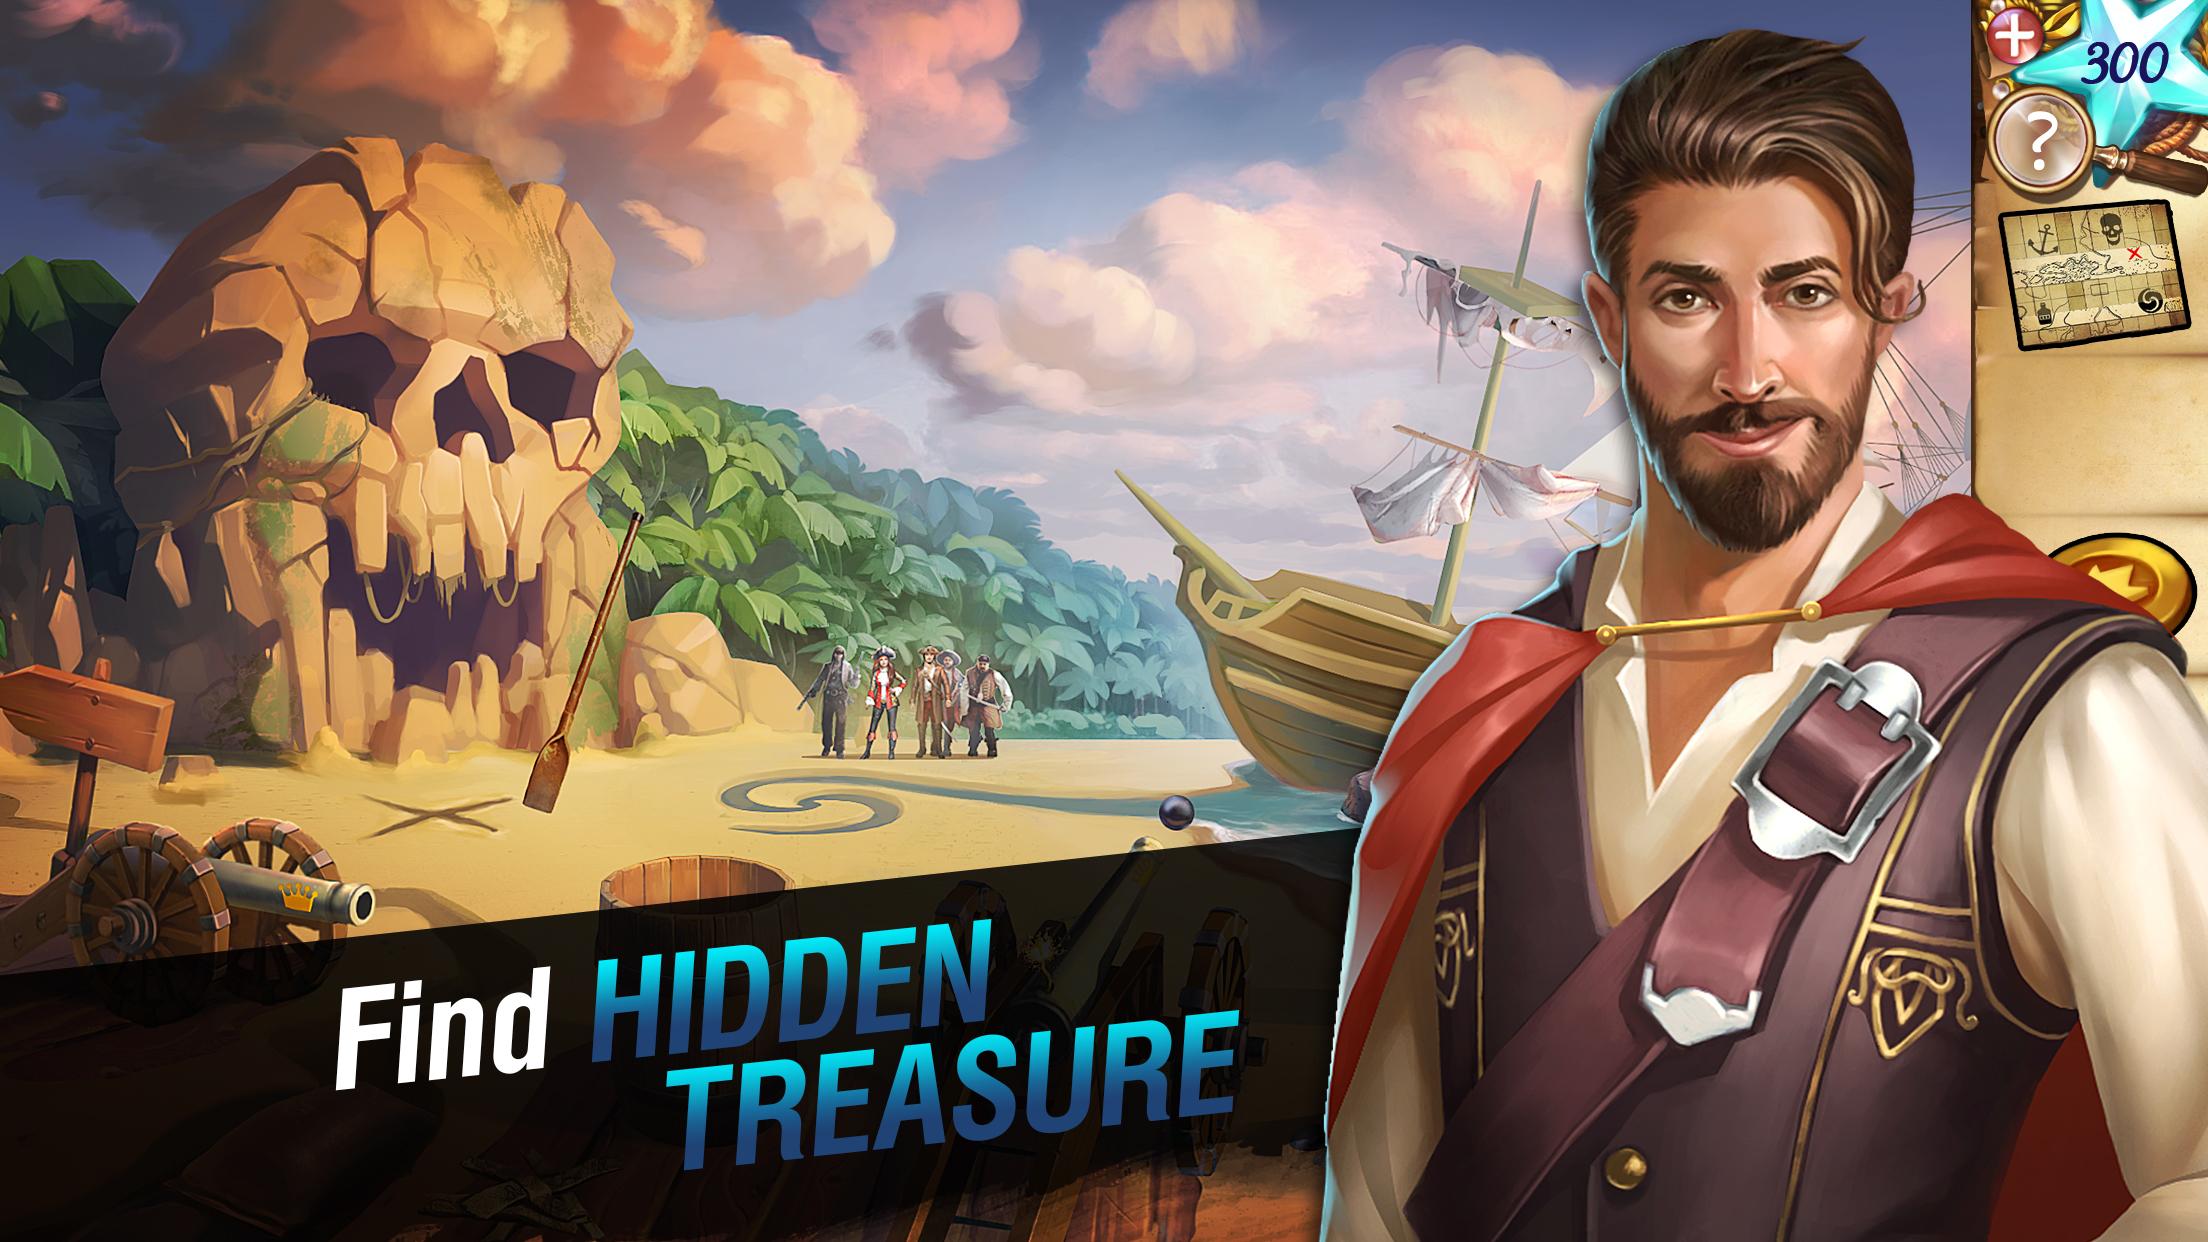
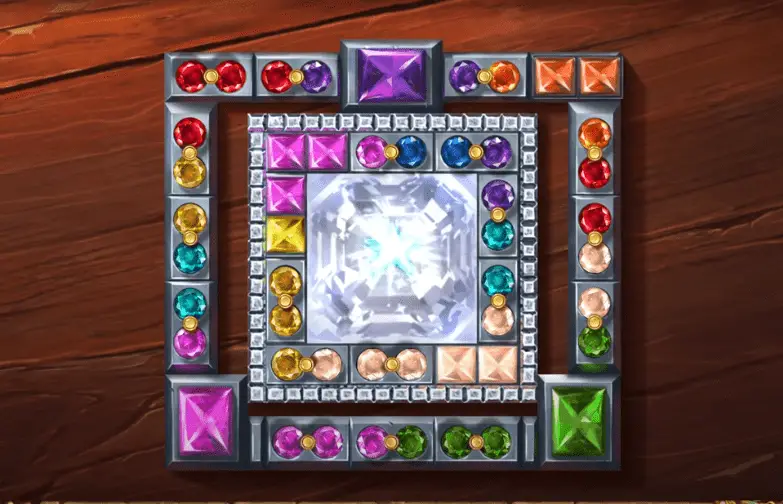
Introduction
Adventure Escape Mysteries features over 100 beautifully illustrated scenes for those players who love playing puzzle-solving and Hidden Objects Games. We’ve already covered the Adventure Escape Mysteries: Trapmaker Walkthrough Guide to help you overcome all challenges quickly. Trapmaker includes eight chapters, and completing each chapter may help you solve the mystery. Furthermore, the main title has over fourteen different mysteries to solve, including the following:
- Trapmaker
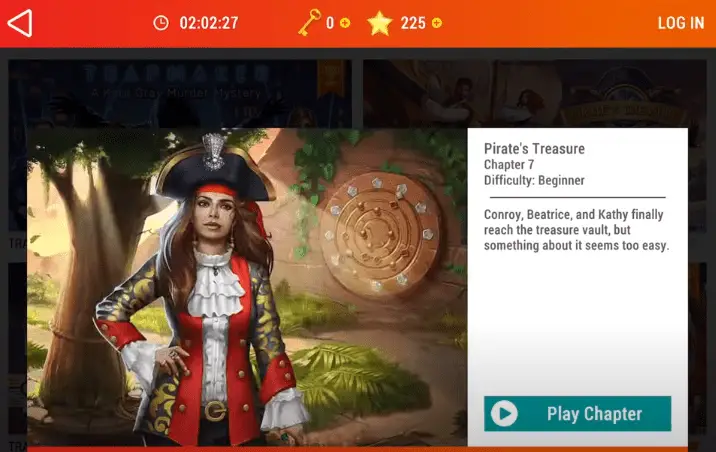
- Pirate’s Treasure
- The Covenant
- Sacred Stones
- Puzzle Pack
- Picture Perfect
- Trapmaker 2
- Painted Worlds
- Trapmaker 3
- Paradise Mystery
- Classic: Haunted Hunt
- Cursed Crown
- Classic: Murder inn
- Classic: Dark Ruins
- Psychic Squad: The Italian Affair (Coming Soon)
The game allows you to be a pirate and explore how all senses are driven. Whether you love to be a detective or not, finding complicated mysteries is compulsory, and their rewards are fruitful. Take a break from your regular work to relax and start playing the game because you need full attention, an intelligent brain, and out-of-the-box thinking to solve puzzles. Furthermore, the graphics are lovely and highly detailed, and the soundtracks are impressive.
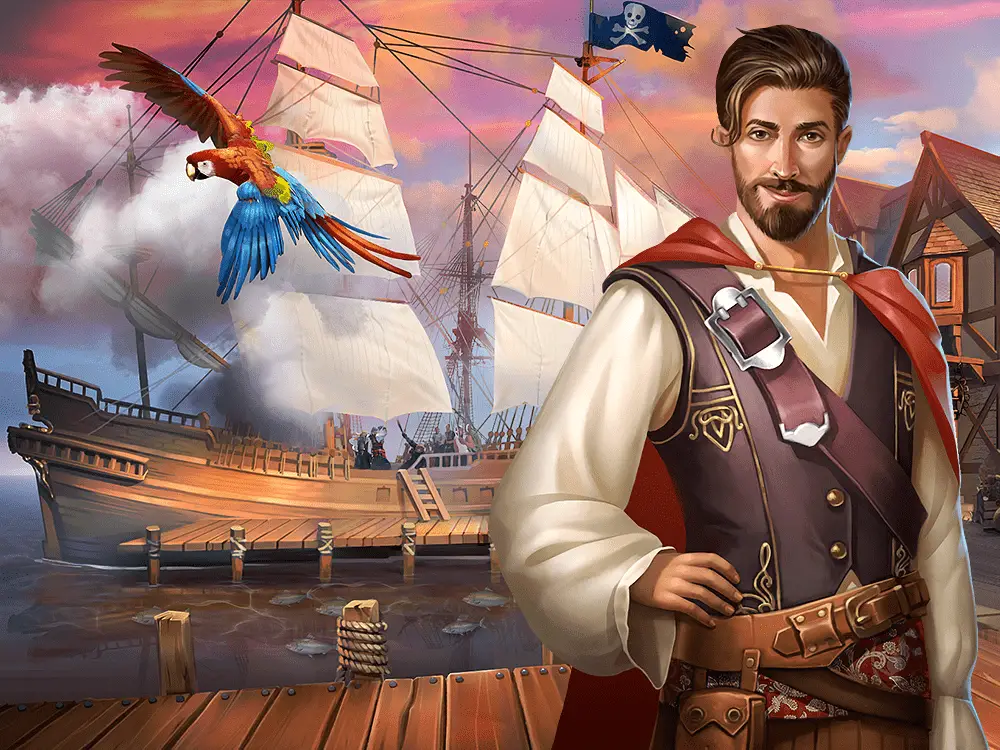
Become a pirate, journey for the massive treasure box, and solve mysteries. Indeed, you would be familiar with keys as you need them to unlock the new mystery. I told you in Adventure Escape Mysteries: Trapmaker that you can’t get into any mystery without using a key. I must spend two keys to open the Adventure Escape Mysteries: Pirate’s Treasure and several days to cover the walkthroughs.
Storyline
After downloading the chapter (Pirate’s Treasure), the game unfolds the story of a queen who lost her closest friend, Kraken. Afterward, she cried in her friend’s grief for a thousand days, and a sea appeared. The surprising part is about to come – after many days of crying, the queen starts t to dissolve into the water. The rest of her parts turned into jewels, such as:
- Emerald Eye
- Twin Tears
- Blood Ruby
- Breath of the Sea
Besides that, all the jewels sank into the sea until the Queen’s Royal Trading Company found them. After that, a ship loaded with gems disappeared from the scene, leaving only Breath of the Sea. Most of your time will be spent reading discussions between characters, and the rest will be spent finding hidden objects and their solutions. Finding hidden objects may not help you complete the level, as you must merge, connect, or utilize them to find the answer. Therefore, you should keep reading Adventure Escape Mysteries: Pirate’s Treasure to get your hands on all hidden objects.
Adventure Escape Mysteries: Pirate’s Treasure Walkthrough –
Chapter 1
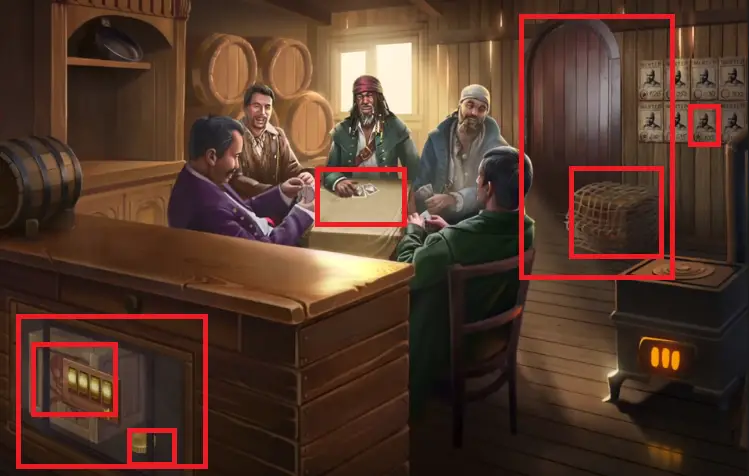
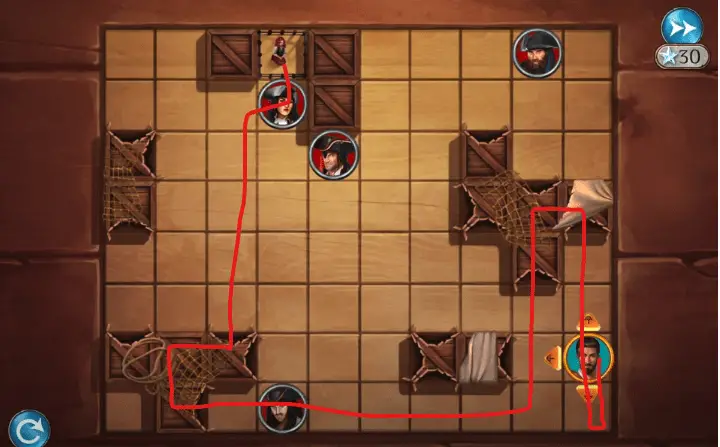
As the first chapter starts, you discover Beatrice, a female character, who appears on your screen to reveal that the necklace is the first treasure they have stolen this month; therefore, you should stay quiet until she gets back from the appraiser. The discussion will continue between three characters, Beatrice, Barkeep, James, and Conroy – the pirate.
Before starting the gameplay, you should know that, like other Hidden Object titles, the game includes a hint system and keeps helping you get tapped. At the start, you have limited hints, and the possibility of running out of hints is very high; therefore, you should keep finding stars to increase your hints in numbers. Here are the steps you should follow for the completion of the first chapter:
- Click on the front wall to reveal images with the years. It would help if you kept 1995 in mind and returned to the table where a locker is placed.
- Head to the locker and enter the year (1995) to open it for collecting a star and a box. Don’t forget to collect a knife from a drawer on the same table. Use the knife to cut the box rope next to the door and manage it.
- Head to the table where play cards are laid. You aim to use a coin to bet from your inventory and guess the cards in the following order or bring the numbers to the cards (32465). It will leave you a hint.
- Once you win, all crewmates will remove their shirts for you to collect. Keep all shirts in your inventory for later use.
Tap the Parrot – Open Area
Afterward, you should open the door and come out to find a beautiful parrot. A pirate is standing on the right side of the parrot. Tap the parrot to collect an image of a fish.
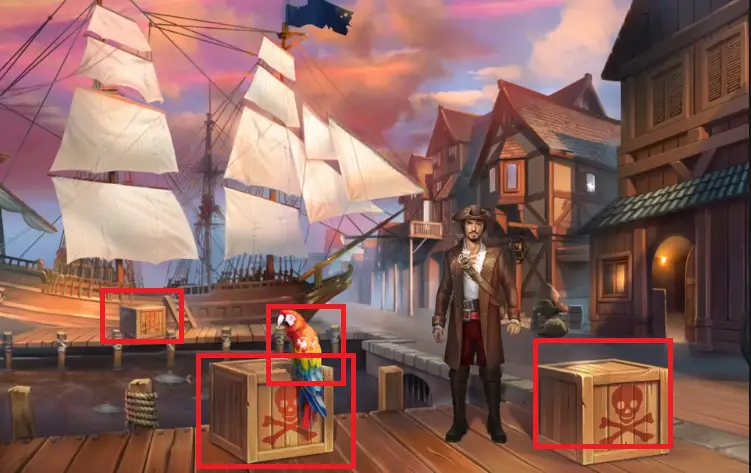
- There’s a box near the ship that, upon tapping, will be added to your inventory.
- Get into the ship and collect a Harpoon, which is available near the lady statue.
- Open the treasure box to bring out and add the Needle and Thread to your inventory.
- Leave the ship and return to your former position ahead of the pirate. Use the Harpoon to catch a fish from the water and add it to your inventory.
- Now, come back to the room to find a pan from the cupboard behind the people sitting on chairs.
- Keep the pan on the stove and add a fish to it. Wait until the fish is roasted. Then, collect the roasted fish and keep it in your inventory.
- Offer the roasted fish to the parrot and let it fly. Then, collect the box the parrot is sitting on and add it to your inventory.
- Now, you should return to the ship to have a skull to get the fourth box near the pirate. Once you are on the vessel, tap on drums where a black cloth is available with a skull diagram. Bring out needles, thread, and t-shirts from your inventory to keep above the cloth. Use the knife to cut the shirts and use them to complete the skull image.
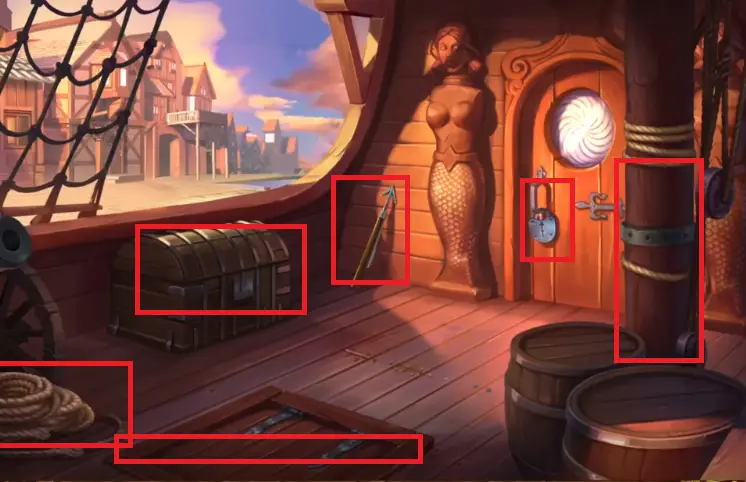
- Once the skull flag is prepared, you should offer it to the pirate and collect the fourth box from nearby.
- Back to the ship, open the door fixed on the floor to the basement, and start playing a mini-game after placing all five boxes you collected from different places.
- Your ultimate goal is to bring all boxes and cannons to their decided places and complete the mini-game when playing the game. The completion of the mini-game will reward you with a hint.
Open the Ship’s Room
- Close the door and collect a key from above the box and the box also.
- Open the ship’s room and get into it.
- Keep the cargo box on the table and collect a fencing saber from the cupboard.
- Use the sword to bring a lock ring out of the floor.
- Tap on the table’s drawer and fix the ring you collected on it to play a mini-game. Once you’ve completed it, collect a letter opener and add it to your inventory.
- Choose the opener to remove the cover of the box you kept on the table and collect a letter.
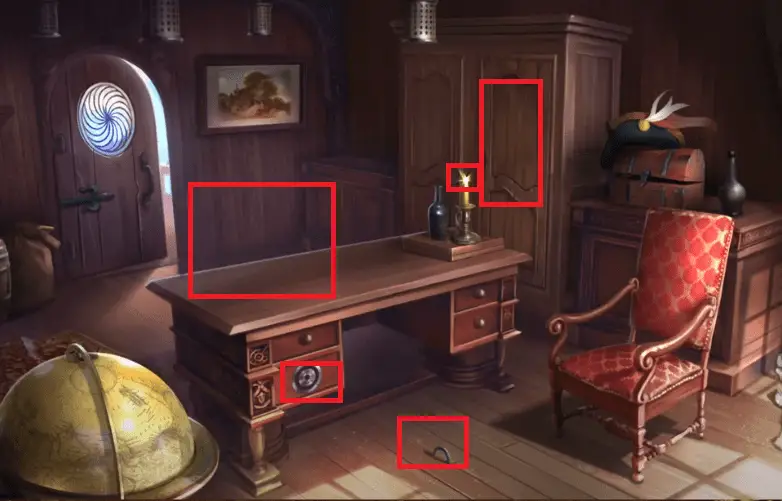
Reveal the Map
The box will reveal a map of Tiny Sam’s Treasure. Furthermore, it indicates that Tiny Sam was a great pirate who sailed the seas and disappeared 20 years ago. Besides a letter, the box contains a photo of a royal family. Come out of the room and escape the island before it’s too late.
Adventure Escape Mysteries: Pirate’s Treasure Walkthrough – Chapter 2
The 2nd chapter will start as you find Tiny Sam’s Treasure Map. After that, Conroy and First Mate Beatrice set sail to find the treasure. Both characters can’t find the treasure without your help; therefore, you should hone your detective skills to overcome all upcoming challenges to become the master. Let’s start completing the Second Chapter following the Adventure Escape Mysteries: Pirate’s Treasure Walkthrough.
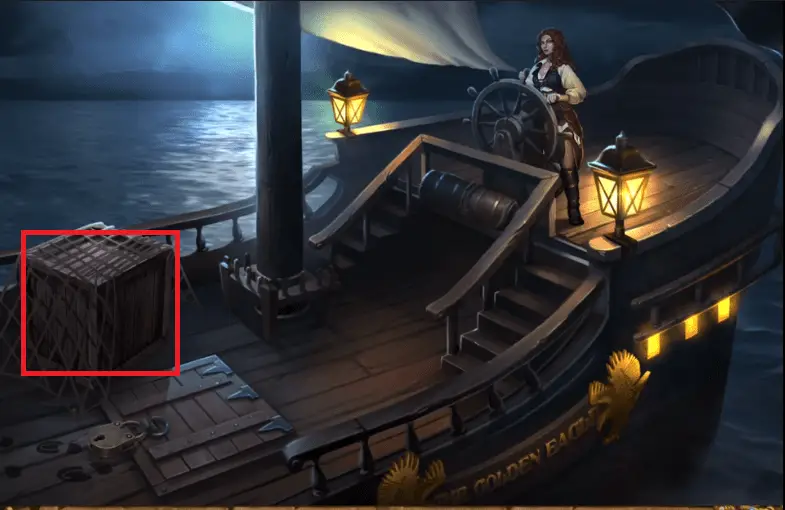
- Collect the rope from the box available on the left side.
- Visit the ship’s left side and connect the rope with the hock on the floor. Afterward, you’ve to collect the grappling hook.
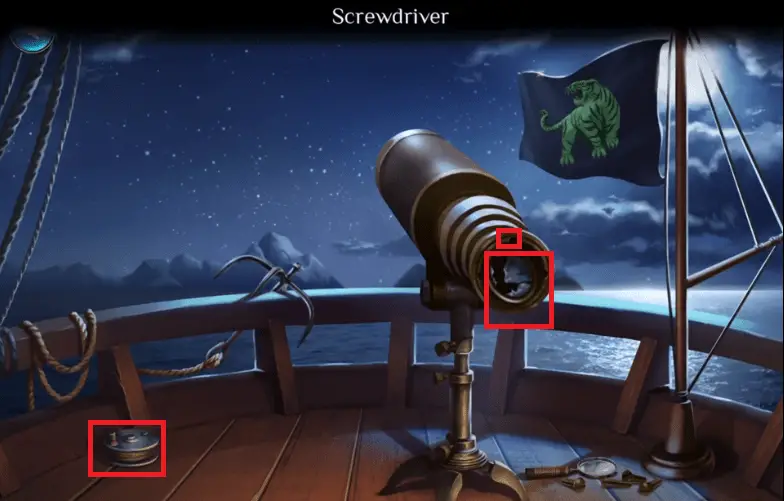
- Pick up a Screwdriver, Navigation Charts, and Magnifying Glass from the table.
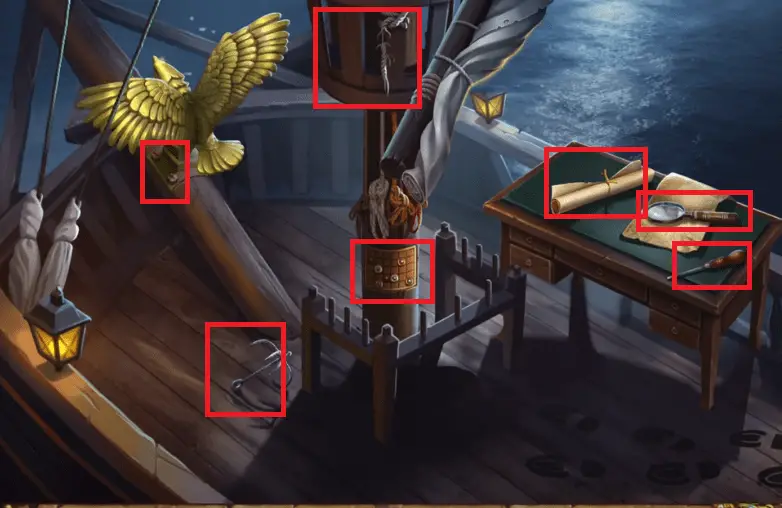
- After watching the map, you know that we had stolen and resold tons of rum.
- Use the screwdriver to untie all screws and collect them. Don’t forget to collect a hint from above the wooden rod.
- You should then collect the grappling hook and connect it with the rod fixed amidst the area next to the table.
- Now, attach the magnifying glass to the telescope and tie all screws using the screwdriver.
- Afterward, pick up a fishing line from above the floor and add it to your inventory. You can collect a hint from the flag above the tiger.

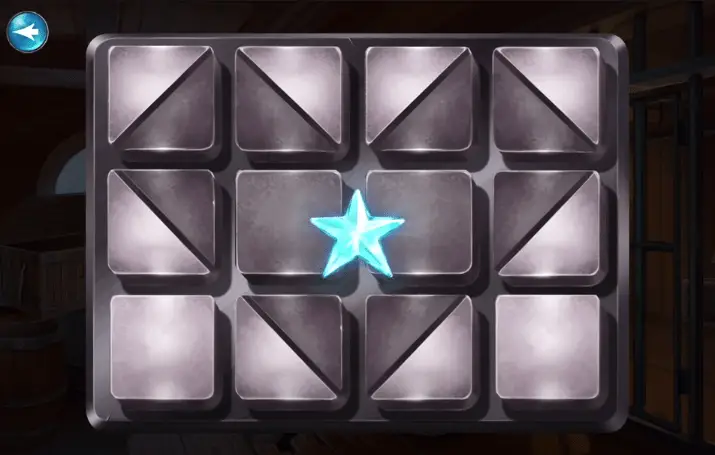
- Now, you should watch through the telescope and play a mini-game wherein your ultimate goal is to connect stars following a pattern drawn on paper.
- Once done, some images will appear in the sky. Back to the main area and start playing a game on the tower near the table, where you collect a screwdriver and magnifying glass.
Play a Mini-Game
The game features buttons of different colors and tasks the player to connect two colors without touching the yarn of others’ colors.
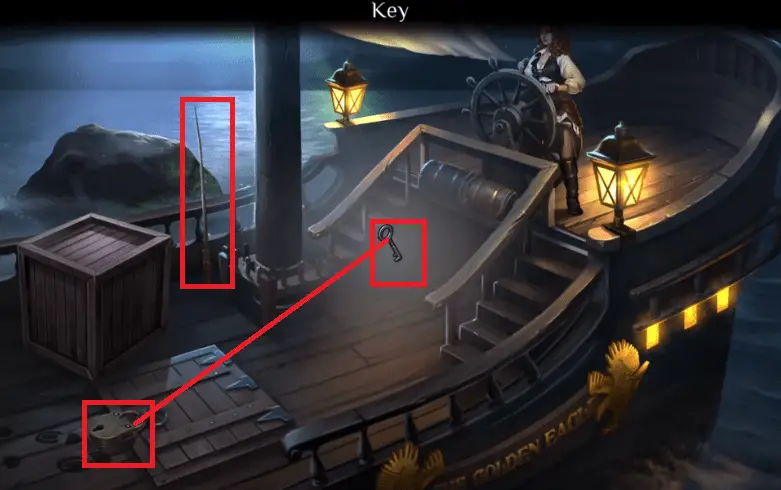
- In the next scene, you must collect a key and attach the fishing line to the rod.
- Using the key, you can open the door to the basement and play a mini-game. You win the game by adjusting the discs with icons like Snake-fish, tiger, eagle, and shark.
- Once the box was opened, I found a coin and some information related to the task.
- Bring the coin from your inventory to the fish rod and throw it into the water. It would help if you waited until something gets stuck within it.
- Once you find some movement, pull the rod up to see what you find. You must keep struggling unless you reveal a mermaid.
Answer the Following Questions
- A mermaid will come out from the water to ask how much treasure you have gathered.
- Select 50,000 Coins and 4,000 Diamonds to answer the question of the mermaid.
- The mermaid will ask about Tiny Sam and the famous reason in the following question. Here, you go with a tree and a bottle of beer.
- Select a silver gem, green, blue, and red rubies to answer the following question.
- Your fourth question is “What did you steal that makes you great?” The answer is a silver gem.
Soon, the mermaid gets fed up with you and becomes angry. She intends to summon a massive storm, and Beatrice suggests you head to the island as soon as possible before it’s too late. As the next scene appears, you find yourself playing a mini-game where you aim to sail the ship left and right to avoid challenging obstacles. Sail the boat professionally and reach the island safely to keep unfolding the storyline. As you get to the island, the game will add three hints to your meter.
Adventure Escape Mysteries: Pirate’s Treasure Walkthrough – Chapter 3
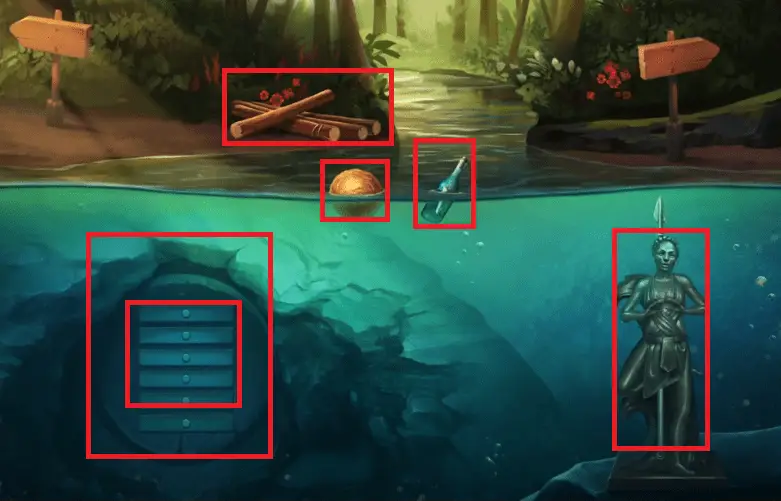
The ship has been wrecked and lost, leaving both characters alone on an island. To unlock the third chapter, you need keys, and once you are in, you must help both characters find the treasure trail again. This time, the third chapter takes place on a beautiful island where you find shipwrecked and mountains surrounding the environment. In the beginning, your objective is to build a fire. You might know what things to set a fire; therefore, collect the following items: Wood, Two Stones, and Kindling.
- Slide the seashell to collect a coin and gather driftwood near the ship. Add both items to your inventory and move to the scene’s left side to reveal more objects.
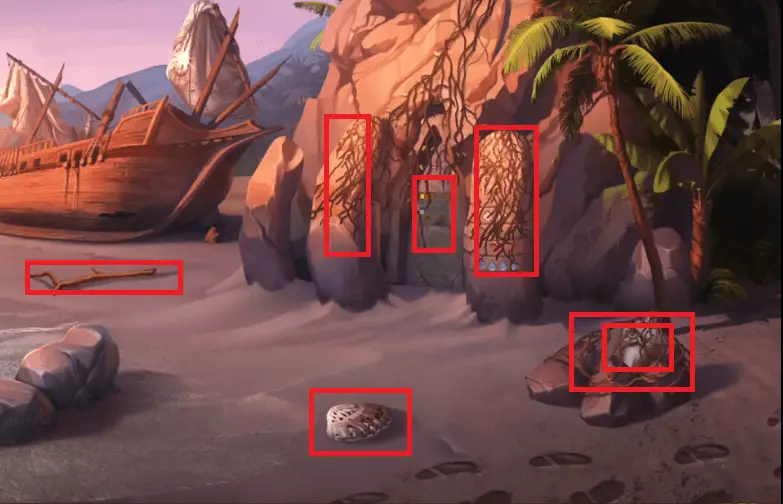
- Pick up the palm leaves from the right side near the trees and keep the driftwood on a stone.
- Search the bushes to find a rock and keep the palm leaves on the stone after driftwood.
- Bring the rock near the palm leaves and make sparks using a coin in your inventory to make a fire.
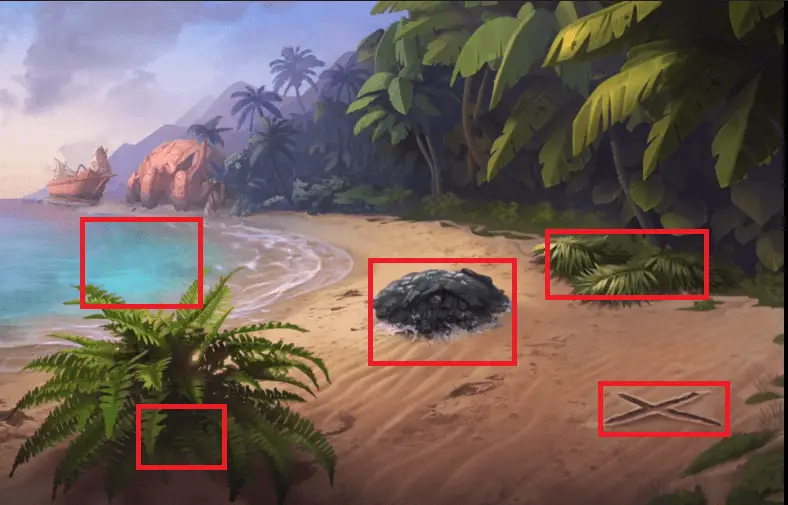
Afterward, Conroy will dive into the water to search the surrounding environment for treasure but fails. Soon, the fire you set will reveal a map, and upon seeing it, it will start showing some notes asking you to burn a beacon between the pillars. Next, start following the path to the massive mountain of gold.
- Collect a torch from near the fire and add it to your inventory.
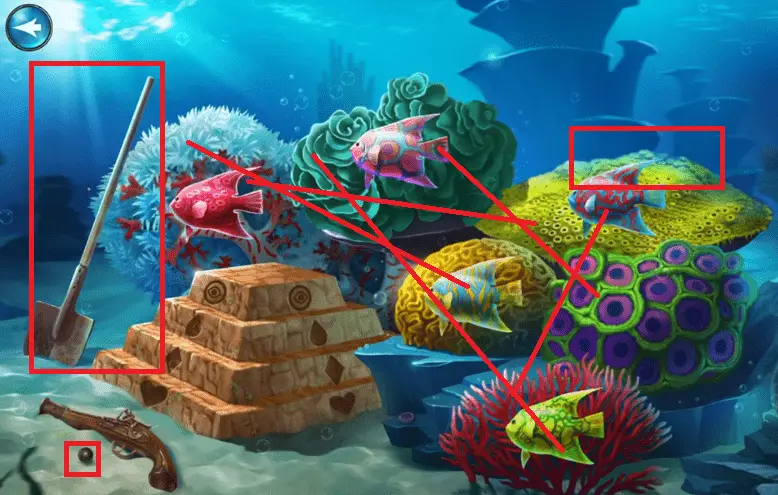
- Jump into the water to collect a ball and a shovel.
- In the next step, following the designs, your ultimate goal is to bring the fish close to the related sea plants. The completion of the puzzle reveals something.
- Now, you should return to where you might have seen a cross sign. Use a shovel to dig the land and reveal a treasure box. Initially, you can’t open the treasure box because it is fully protected with a lock. It seems a ball is missing, but it is available in your inventory. Use the ball to solve the puzzle and unlock the treasure box to see what is hidden.
- After keeping the ball on the locker, use your wit to bring the ball to the 2nd end by merely rotating the plate.
- The treasure box will reveal a doorpiece resembling a gold block.
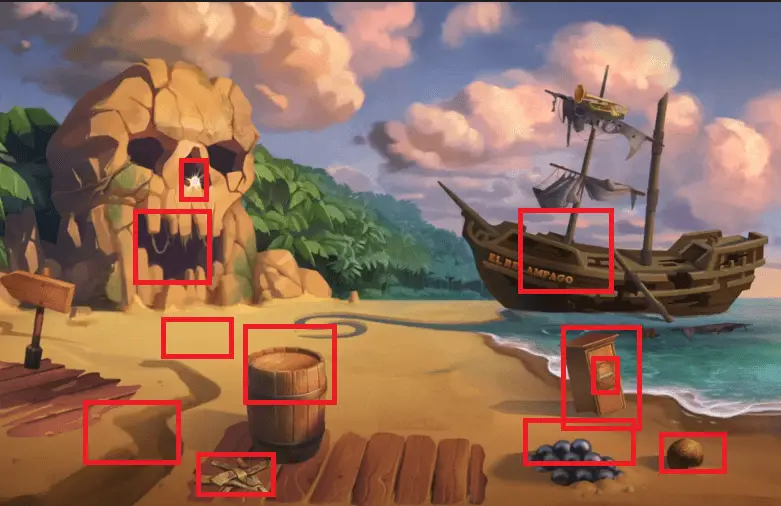
- Now, you should return to the main area where you started the game. Bushes have covered the stone and the main door, which you can burn using the torch.
- Collect an idol from the stone to add to your inventory.
- Head to the main door’s tower and set the following objects from up to down: Three Green Eyes, a Drop, Two Squares, and Two Hearts. Next to that, a tray holding another doorpiece will come out.
- Now, you must return to the sea and place an idol on a tray you found after completing a fish mini-game. Set all statues to solve the puzzle and collect the third door piece.

Here’s a Guide on How to find Door Pieces in the Third Chapter of Pirate’s Treasure:
- First Door Piece: Collect a shovel from the sea and start digging the land below the “X” Mark to reveal a treasure box holding a door piece.
- Second Door Piece – Burn the bushes above the stone and the door. Head to the tower and play a mini-game to collect the 2nd door piece.
- Third Door Piece – You can collect the third door piece by collecting an idol and keeping it on a board you found in the sea.
After learning to collect three-door pieces, you must visit the door and place all the missing pieces to start a mini-game.
- Add all door pieces and fill the grid with squares. It would help if you kept in mind that each column and row have the same number of gold and silver blocks; therefore, three same-colored blocks can’t be next to each other.
- We have completed the third chapter and opened a gate to the new environment. Let’s start to complete the Pirate’s Treasure Chapter 4.
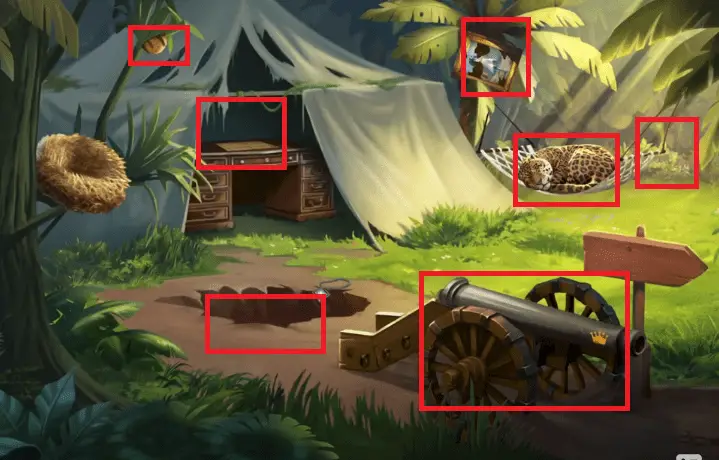
Adventure Escape Mysteries: Pirate’s Treasure Walkthrough – Chapter 4
The fourth chapter takes both characters, Conroy and Beatrice, a step away from the treasure. The fourth chapter seems challenging and comes with tricky puzzles to solve. Interacting with the environment using intuitive controls is pretty straightforward, but the way you follow to solve puzzles is quite challenging and may chill your bones. It is impossible to unlock a new chapter without using keys, although it may be possible using Adventure Escape Mysteries: Pirate’s Treasure Mod.
Moreover, every chapter starts with a conversation between both characters, discussing that the woods of their ships are rotten speedily. Whenever you discover a glowing object, don’t forget to collect it because it is a hint that helps you in a difficult time. Follow the steps mentioned in Pirate’s Treasure Walkthrough:
- There’s coconut on the land you have to collect, as well as paper strips near the drum.
- Something like a letterbox is available on the land, which is secured with a locker. You must find a four-digit code to unlock it. The code to open the box is (4854), revealing a mini-game built using gems of different colors.
How to Play Sweet Treasure Mini-Game?
When playing the game, you are tasked with rotating and moving small gems so that each one in the casing has the same color.
- Once the mini-game is completed, you can collect a diamond necklace.
- Afterward, move inside the massive skull, where you may discover a beautiful canal holding objects such as a ball, a bottle, and more.
- Break the bottle to collect the paper stripes, and add a coconut to your inventory.
- Now, the game leads you to a new environment where you may discover a cannon, a tiger, and other beautiful objects. Like previous stages, your ultimate goal is to find hidden objects using your detective skills and utilize them to solve tricky puzzles.
- Explore the newly unlocked environment, where you may discover a painting on the right side near the trees. After watching the woman’s pose in the painting, you should go back to the water to make the same pose using the statue. Once done, it will reveal a spear for you to gather.
- Click on the window next to the statue on the left side of the screen, and tap on each wooden piece to bring the given number of dots: 4, 4, 2, 5, 1, and 3.
- The door will open and reveal a bottle. Break the bottle to collect paper stripes.
Main Area
After collecting the items, you should return to the main area. Use the spear to remove the drum’s cover and collect Salt Cure Meat.
- Visit the area where you have found a tiger. Offer the tiger a piece of meat and collect the rope.
- Use the spear to bring a coconut down from a tree. Collect it and add it to your inventory.
- There’s a tiny hut where you must tap on the table. Keep the paper string on the table and play a mini-game to complete the map. Once it is done, add it to your inventory and leave the environment.
- Now, you should use the spade to move the cannon to the water and keep all the coconuts and rope near it. Build a raft to take the cannon to another side and drop the wooden pieces into the water.
- Visit the main area, use the map, and adjust it according to the skull. Once done, bring the spade out of your inventory and start digging the land below the X mark to collect a sack of salt.
- Keep the sacks of salt to make a way and bring the cannon machine near the drum.
- Reload the cannon and fire to destroy the ship.
Following all the steps mentioned in Adventure Escape Mysteries: Pirate’s Treasure Walkthrough, you can efficiently complete the 4th chapter.
Adventure Escape Mysteries: Pirate’s Treasure Walkthrough – Chapter 5
Escaping the island may put both characters ahead of a new problem. From somewhere, Admiral Kathy appears and arrests Beatrice and Conroy, leaving them in a massive brig. Now, both characters need your help to come out of the trouble they are facing. There are three different difficulty levels for all types of players. Currently, I’m playing the game with beginner difficulty.
As the game starts, Kathy visits Conroy and Tanks to bring her a treasure map. Behind her, you must help Conroy find Beatrice while searching for supplies under the floorboards. We have compiled a Pirate’s Treasure Guide for those searching for it to complete challenging puzzles.
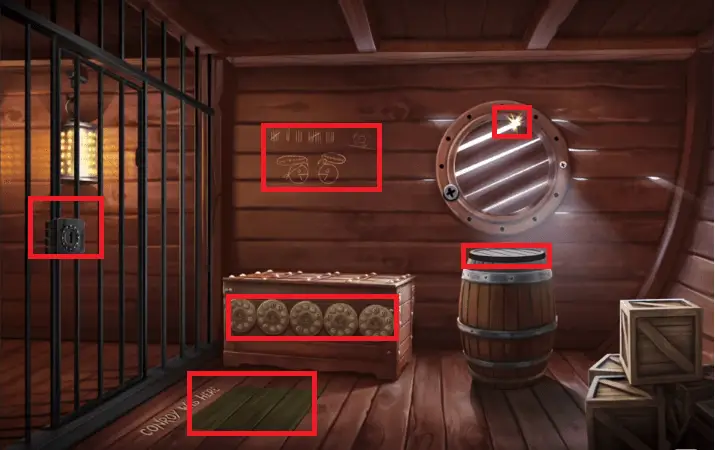
- Firstly, you should collect a hint from above the windows.
- Head to the box near the front wall and set the locker to open the box and collect a spoon. Tap the ball after four digits in the first circle. Similarly, it would help if you tapped the ball after 1, hit the ball leaving three blocks after 9, clicked on the 7th, and hit the 4th ball in the last circle.
- Now, you should use the spoon to remove the drum’s cover and the floorboard.
- Dive in the drum to bring out a looking glass and start playing a mini-game found on the floor. When playing the game, your ultimate goal is to bring the board out of the way and collect a handbag when it gets completed.
- You can’t directly bring the purse out; therefore, you should use a looking glass from your inventory to collect a bag. Open the bag and pick up a lockpick from there.
How to open a prison?
Now, bring the lockpick close to the locker and set them both as follows: 3:25, 6:45, 12:00, and 3:40.
- Get into the locker and start finding Beatrice on the other side of the ship. Your ultimate goal is to reach her without being detected. There are lots of hollow boxes available that you can use to hide from Kathy’s Crew.
How to Save Beatrice in Prison’s Treasure?
Beatrice is in trouble, and she needs your help to get herself free. Three characters are hired to guard Beatrice’s prisoner. Making use of boxes may help you distract the crew’s attention, searching for you; meanwhile, guarding the prison so no one can flee it from there.
The door will close once you enter the prison, leaving both characters trapped within it. Follow the instructions given in the Adventure Escape Mysteries: Pirate’s Treasure Guide to complete the puzzle:
- Collect bread from near the drums and add it to your inventory.
- Use the looking glass to see out of the window and let the bird get in to help you.
- The bird holds a coin in its beak and may give you something in exchange for something. You only have bread you can offer the bird to collect a coin.
- In the next scene, the crew member will appear ahead of the trapdoor upon ringing a bell and give you a key to the garbage chest.
- Open the chest to collect cheese using a key and add it to your inventory. Later on, offer the cheese to a mouse.
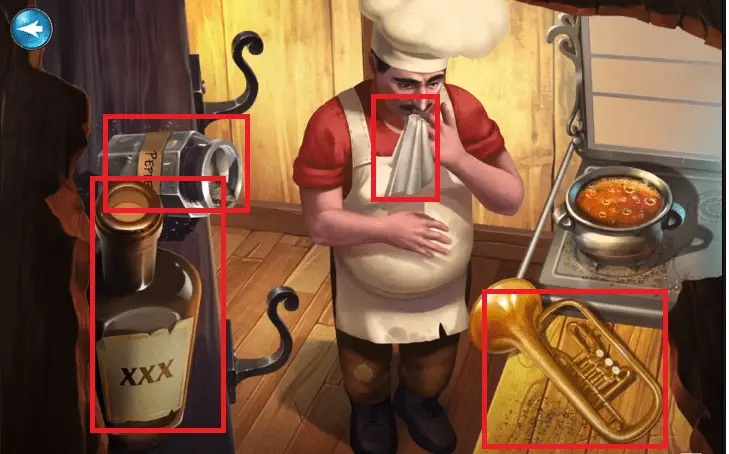
- There’s a crack in the floor; you must watch through it to see what’s happening there. A chef is cooking a delicious meal for crew members, and your ultimate goal is to drop the bottle of black pepper until he sneezes and uses a handkerchief to clean his nose. Next to that, he leaves it on the shelf. Collect the handkerchief, along with a bottle of alcohol, and go back to your primary area.
How to Open the Cupboard in Pirate’s Treasure Chapter 5?
- Head to the cupboard, drop some alcohol in its locker and use the handkerchief to clean it. Next, draw a heart to open its doors and see what is there.
- I found two objects inside the cupboard: a Cane and a Basket.
- Use the basket to catch the mouse and leave it on the chef so he escapes. Note: Remember to keep the cheese from the hole to let the mouse come out.
- Making use of a cane may help you collect a horn.
- Afterward, play the horn three times to summon a sea creature and escape.
Adventure Escape Mysteries: Pirate’s Treasure Walkthrough – Chapter 6
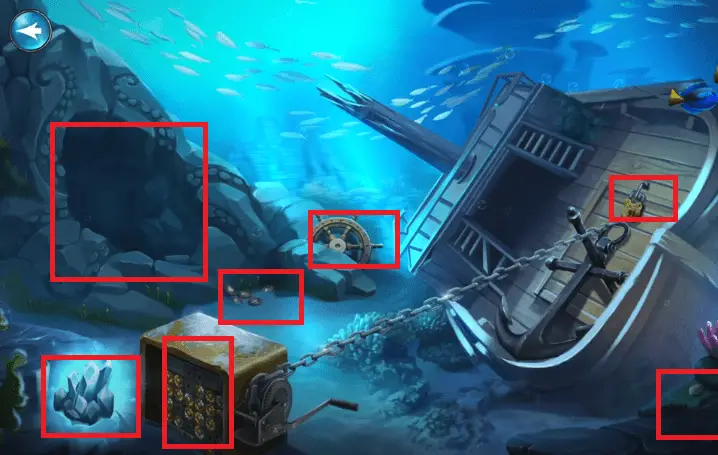
You destroyed Kathy’s ship with the help of the tentacle beast. Now, you must help out Conroy to manipulate its lair to discover an escape path. The said thing will happen in Pirate’s Treasure Chapter 6, and we will help you figure out how to do it with the help of a walkthrough. The opening scene displays lots of boxes and two characters behind them.
- Tap the boxes to remove them and hit the lady on the right side.
Afterward, Conroy realizes that he has to rescue Kathy because she has a map. To do so, he must take both Kathy and Beatrice to a safe place, which may be an underwater cave.
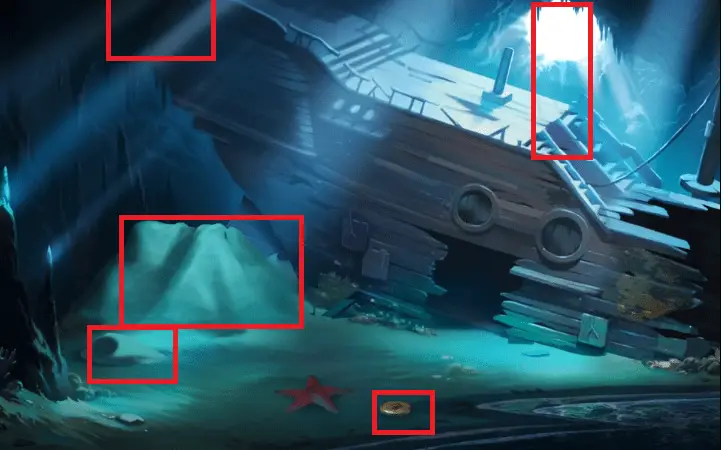
- Collect a coin and crystals from the bottom. Tap the starfish to let it reveal a gear that you must collect and add to your inventory.
- Gather crystals from both sides of the scene and head to the cave, where you may collect weights.
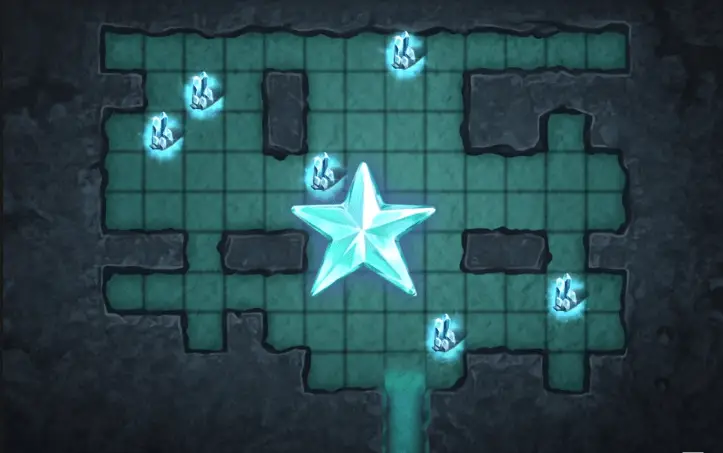
How do you light up the cave in Private’s Treasure?
Three crystals are already available in the inventory that you must use to light up the darkest cave. In short, it’s a mini-game that you have to play and place crystals in their proper locations so they light up all the scenes, and your mini-game gets completed.
After getting into the cave, you have to collect the following things: The monster tooth and Tiny Sam’s Map. The collection of items will lead you to the main area, where a discussion starts between three characters, and Kathy demands to offer a map in exchange for a ring.
- Offer the map to Kathy and collect a signed ring from her.
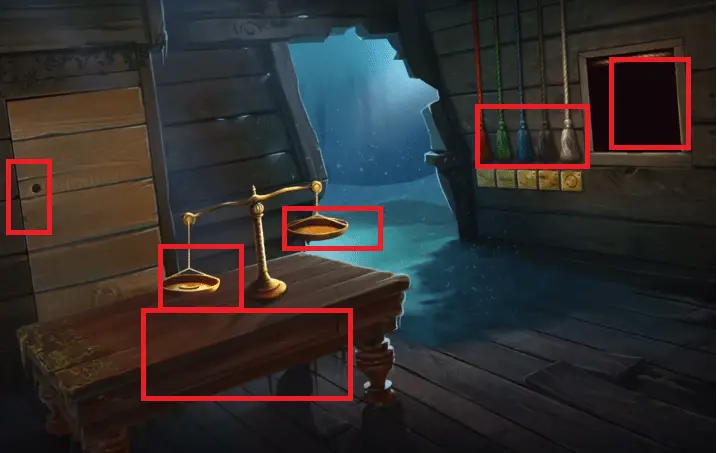
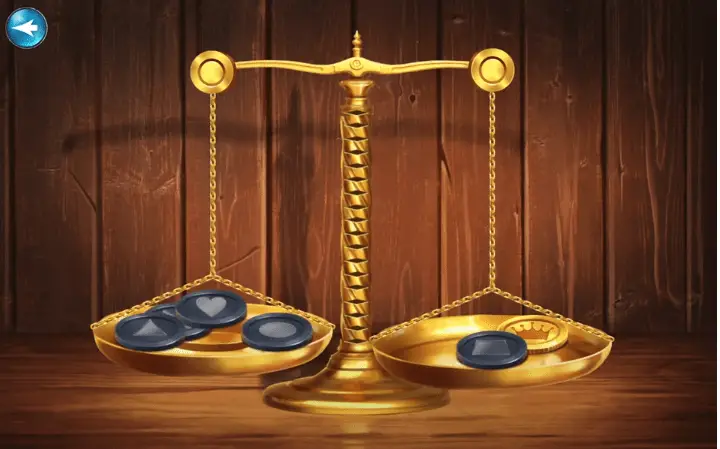
After that, get into the ship, where you find a weight machine. Keep all weights down along with the coin and start a mini-game. Your task is to balance both sides of the device to win. The drawer will open as you balance both sites of the weight machine, and it will bring you a map, known as a cargo manifest.
How do you pull cords puzzle in Pirate’s Treasure Game?
Solving the pulling cords puzzle isn’t easy; we bring you Pirate’s Treasure Guide to help. It would help if you used the cargo manifest map to understand the pattern of pulling cords. Here’s a list of colors you should follow to complete the puzzle: Green, Blue, Blue, Green, Blue, Blue, Dark Brown, Dark Brown, and Dark Brown. Pulling the cords will bring a box containing a gear and fire poker.
- Use the signet Ring to open the door behind the table, revealing the father’s image of Kathy, Admiral Alistair Arya.
- There’s a locker behind the image; you must tap to the specific locations to open it. Firstly, tap the flamingo available on the hand and hit the badge, duck, moon, and star on the left side of the image.
- As I mentioned above, tapping the objects will open the locker and give you two gears. Collect the gears and add them to your inventory for later use.
- Now, you should move to the ship’s front side to collect a steering wheel with the help of a fire poker.
- Head to the machine with which the ship’s chain is connected to play a mini-game. Add all the gears you found from different places and start playing the game. Rule: You must move the gears to bring them in adjacent colors.
- Once it gets completed, you should move back to the main area. Using the wheel and tapping the stack of sand may help you reveal a locker.
- Open the safe, use the monster tooth to cut it, and reveal a key you can collect.
- Grab the key and visit the area where you played a mini-game using gears. Use the key to open the ship’s locker and collect a ladder.
- Use the ladder to reach the surface before it’s too late.
Adventure Escape Mysteries: Pirate’s Treasure Walkthrough – Chapter 7
Finally, all characters have successfully escaped the underwater environment. After leaving the scene, Kathy, Beatrice, and Conroy reach the treasure vault, where new challenges await them.
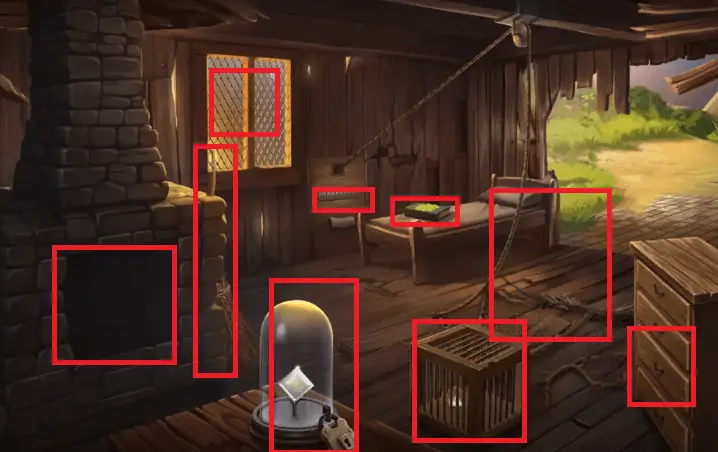
- First, you must collect a cage from the ground and add it to your inventory.
- Find and collect the broom on the right side of the fireplace. Afterward, open the third drawer to collect a needle and thread.
- Keep the cage inside the fireplace and use the broom to break the window.
- Come out of the room using the window and find the crystals you need to open the locker.
- Soon, Conroy finds himself in a trap and throws his shoes and a key for Beatrice.
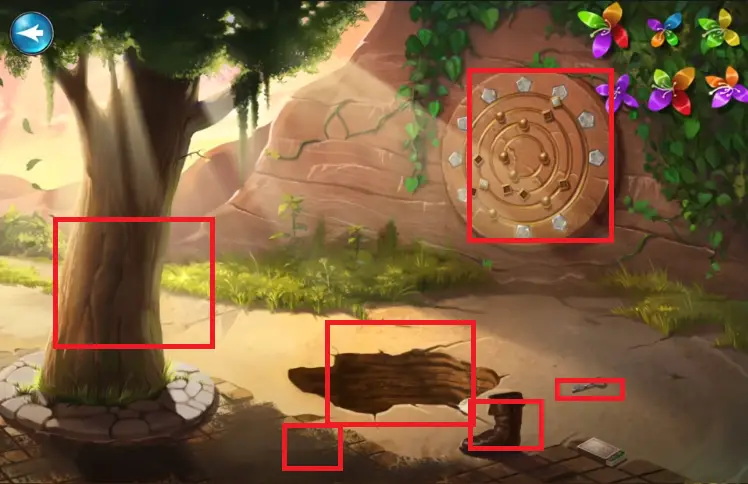
- Use the broom to clean the surface near the tree, find the first crystal, and add it to your inventory.
- You can turn a shoe into a glove using a needle and thread. Before leaving the scene, don’t forget to collect a key and a matchbox.
- Return to the room and burn the cage into the fireplace with a matchbox.
- As Beatrice keeps her foot on a rope, she gets trapped.
- Now, you should use the glove to collect crystals from the broken mirrors and the fireplace where you burnt the cage.
- There’s a book on the bed that you must unlock by playing a mini-game. Read the book to reveal the code and bring Beatrice down. The code you need to flee Beatrice is 22361.
- Use the key to open the cage hanging with rope to collect another piece of crystal.
- Collect the rope and come out to see Conroy.
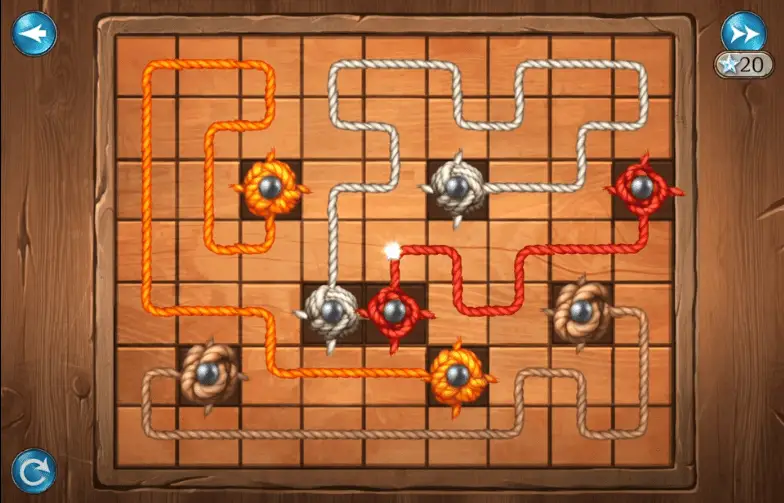
- Tie the rope with the tree and throw it to a massive pit to bring Conroy out of it, but first, you need to play a mini-game with a specific rule. Rule: You need to make a sequence with 21 loops; meanwhile, you should connect all knots on both ends, too.
- As Conroy comes out, he reveals that he also found a crystal down there.
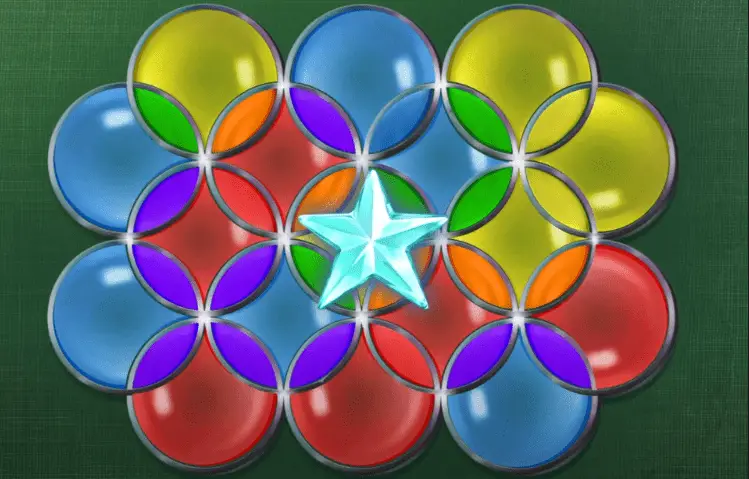
- Add all crystals so that all outer gems are lit up. Once done, the gate will open, leading you to a treasure cave where you may discover lots of gold and valuable gemstones.
Ops! Tiny Sam is Alive
The story takes a twist and brings Tiny Sam ahead of you when you are almost a step away from the massive treasure. Tiny Sam summons an enormous sea creature to eliminate all of you. Did you notice? Some weapons are available near the treasure that you must grab to fight.
- In the next scene, you must help all characters pick up available weapons, such as a Sword, arrow bow, and a Slingshot.
- The battle starts on a grid-based map where you must add a block between sea monsters to defeat them. You should add all blocks so that no monster remains alive.
- In the last scene of Pirate’s Treasure, Chapter 7, Tiny Sam shoots Conroy, and Beatrice releases an arrow on Tiny Sam.
The end of chapter 7 is downhearted, but you don’t need to be sad because Beatrice travels to the land of the dead to rescue Conroy using the Red Ruby.
Pirate’s Treasure Walkthrough – Chapter 8
To be Continued.
 CodyCross Answers
 Daily Themed Crossword Answers
 Top 7 Answers
 Word Craze Answers