NBA 2K27: Best Camera, Controller and Shot Meter Settings Explained
NBA 2K27's Shot Meter, camera, controller assists and MyPLAYER Builder choices all shape how shooting, defense and dunking feel after Patch 2.0. This guide explains what each setting actually does, grounded in 2K's own description of the Dunk Meter, Takeover System and Build Specialization, plus a sensible starting setup for new and returning players.
NBA 2K27's on-court feel changes more from a menu than from any roster update. The Shot Meter, the camera, your controller's assist sliders and the way you build your MyPLAYER all interact, and getting them right matters more after Patch 2.0 reworked contests, steals and dunks around Season 2's October 16 launch. Here's what each setting actually does, grounded in 2K's own description of the mechanics, so you can set up NBA 2K27 the way it's meant to be played rather than guessing.
1. Why Your Settings Change How NBA 2K27 Feels
NBA 2K27's gameplay systems were rebuilt around a single idea: defense and offense should react to positioning in real time rather than to a fixed animation or a flat percentage. 2K's own description of the new Dunk Meter calls it a fully dynamic, skill-based system that "continuously evaluates defensive positioning from the moment players take off" through the finish, so the green window expands against an open lane and shrinks when a defender recovers late. The publisher has also said AI defenders "contest shots more effectively and hold their positioning better" in modes like The REC. Because so much now depends on timing and positioning feedback, the settings that control how that feedback reaches you — the Shot Meter, the camera, and your defensive assist sliders — do more work this year than in past entries.
2. Shot Meter and Shot Timing: On, Off, or In Between
The Shot Meter toggle is the single biggest decision in your settings menu. Leaving it on gives you a visible bar and a clear release window, which is the easiest way to learn a new jumpshot or get a feel for a MyPLAYER you just built. 2K's gameplay director has said in community Q&As that shooting without the meter has carried a small accuracy bonus in recent NBA 2K games, which is why a lot of higher-level Park, Rec and Pro-Am players eventually turn it off and shoot on pure rhythm instead. There's no wrong answer here, but treat it as a progression: learn your shot with the meter visible, then try a few practice sessions with it off before you take it into ranked modes.
Shot Timing Visual Cue is a separate option worth knowing about if you keep the meter on. It can be set so the feedback appears earlier in your shot's motion (a "push" style cue) or later, closer to release. An earlier cue gives you more reaction time but less precision right at the moment that matters; a later cue is harder to read at first but lines up more naturally with your actual release point once you're used to it. If your green releases feel inconsistent, that cue timing — not just your thumb — is often the real problem.
3. Camera Settings: Zoom, Height and Auto Flip
NBA 2K27 keeps the broadcast-style 2K camera as the default, but the exact Zoom and Height values change how much of the floor you can see versus how large and readable your player model is. Zooming out and raising the camera height gives you more court vision for reading double-teams and open shooters, which matters more now that AI defenders rotate and contest more aggressively. Zooming in tighter makes individual animations — your own release, a defender's hand position — easier to read, which can help while you're still learning the new contest system. If the default 2K Camera ever feels too far from the action in isolation-heavy modes like MyCAREER, the game's alternate "2K Low" camera option sits closer to the hardwood and is worth trying for a session before you commit to one setup.
Two smaller camera toggles are worth turning on by default: Auto Flip, which automatically reorients the camera toward your basket on a change of possession so you're never shooting at the wrong hoop, and Fix Height, which keeps the camera's vertical position consistent instead of drifting during fast breaks.
4. Controller Settings for Defense and Ball Handling
On defense, Defensive Assist Strength and Boxout Assist Strength control how much the game's automatic positioning helps you stay in front of your man and box out on the glass. Lower values put more of the job on your own stick skill and timing — tougher at first, but it rewards players who've learned the new contest window rather than leaning on assist. Pro Stick Defense, which lets you use the right stick to contest, swipe or go for a steal, is worth setting to a mode that keeps steal attempts deliberate; Patch 2.0 increased the penalty for mistimed steals from lower-rated defenders, so a hair-trigger defensive stick setup will get punished more than it used to.
On offense, a couple of dribbling toggles are worth checking if you're getting animations you didn't ask for: Passive Dribble Hand Switches and Auto Lob to Moving Receiver can both fire off automatically unless you turn them off, which matters more now that Patch 2.0 also tuned several dribbling exploits and tightened the direction change required to trigger an ankle-breaker.
5. The Takeover System and HUD Options
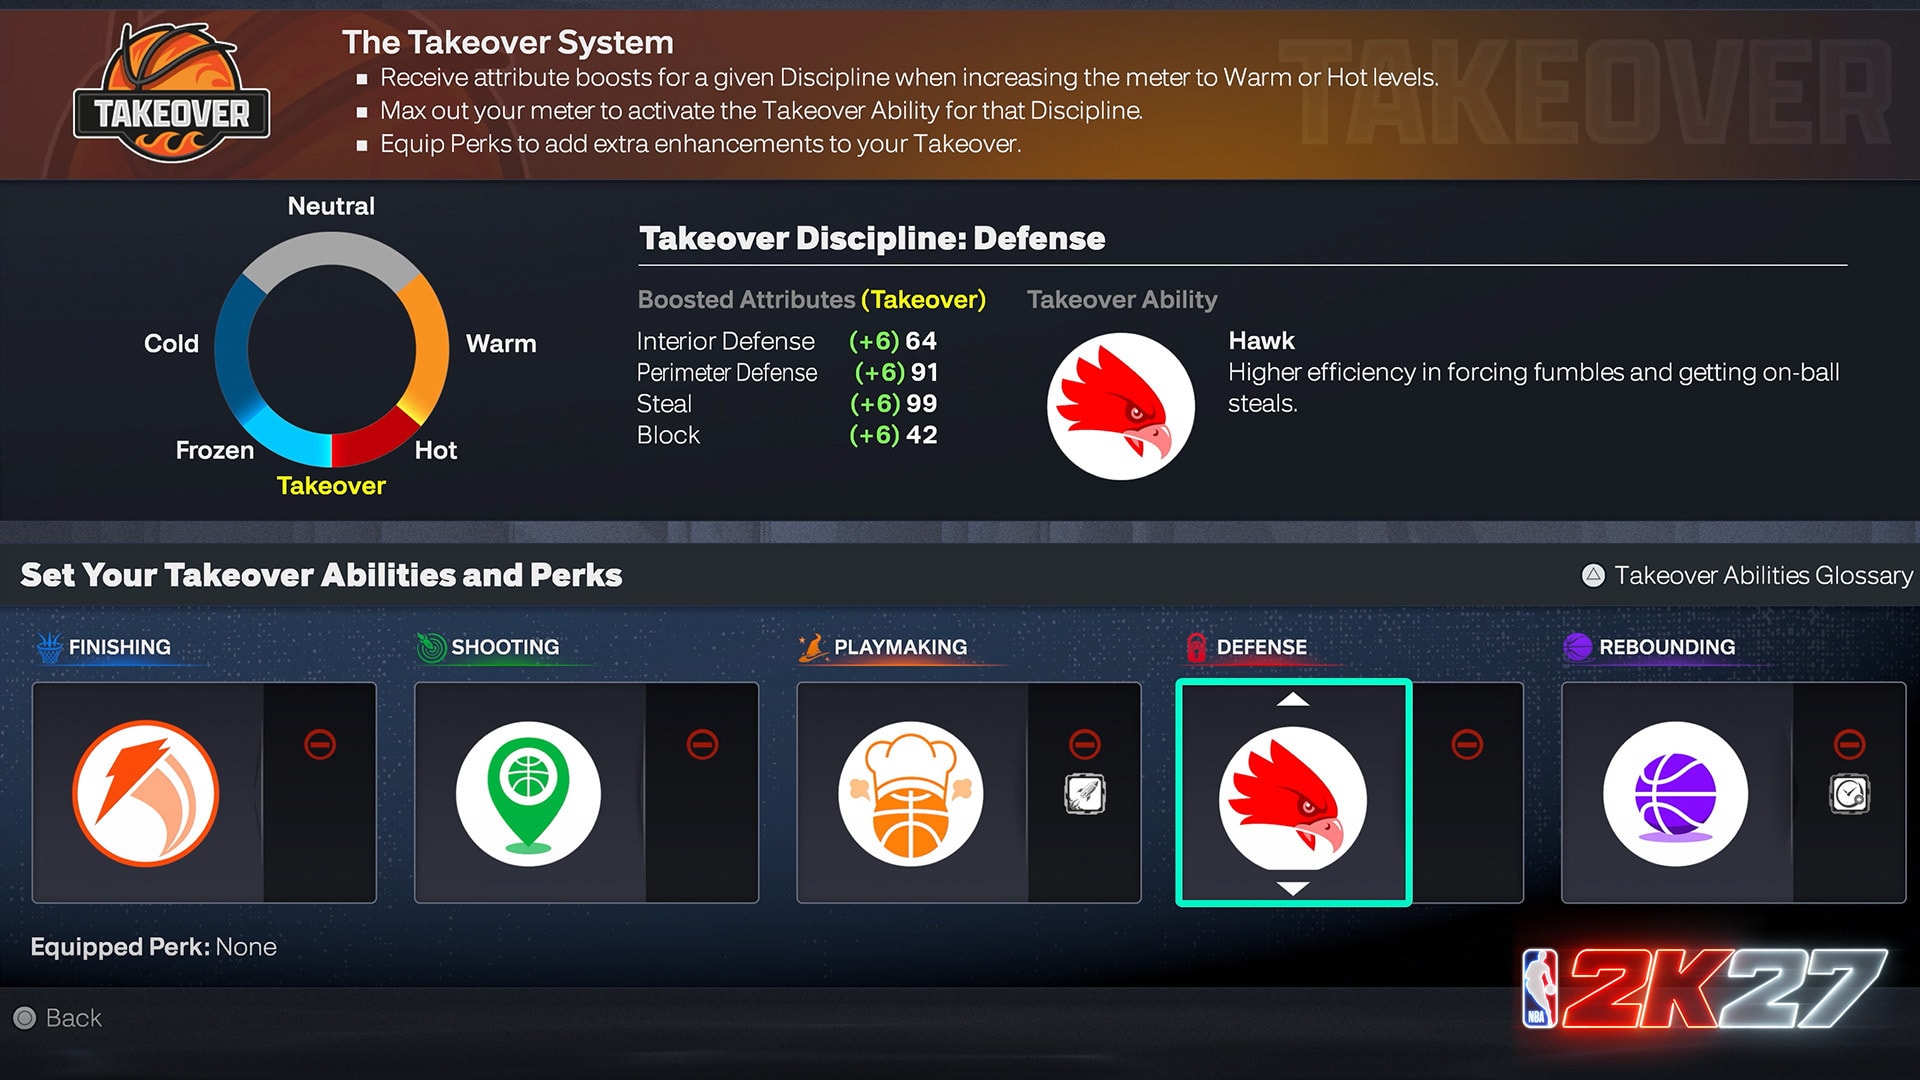
Takeover is built around a meter, not a toggle, but how you read and manage it is still a settings question in practice. Each of the five disciplines — Finishing, Shooting, Playmaking, Defense and Rebounding — has its own meter that moves between Cold, Neutral, Warm and Hot as you perform well in that category. Reaching Warm or Hot grants a flat attribute boost to that discipline's key ratings; maxing the meter out activates a full Takeover Ability, and you can equip a Perk underneath each discipline for an extra enhancement. A Defense Takeover, for example, boosts ratings like Perimeter Defense and Steal and can unlock an ability like "Hawk," which raises your efficiency at forcing fumbles and jumping passing lanes. Keep the in-game HUD element for your Takeover meter visible rather than hiding it — it's the clearest signal you have for when to gamble on a steal or crash the glass instead of playing it safe.
6. MyPLAYER Builder Settings: Cap Breakers and Build Specialization
Your Builder choices are effectively another layer of settings, since they decide which gameplay systems will actually matter for your player. Build Specialization lets you commit to Shooting, Playmaking, Defense, Rebounding or Physicals, each gated behind its own attribute requirements — Shooting needs 60 Mid-Range and 60 Three-Point, for instance, while Defense accepts either 60 Perimeter Defense and 60 Steal, or 60 Interior Defense and 60 Block. Choosing a specialization opens a dedicated quest track with its own rewards, so it's worth picking the path that matches the Takeover discipline and shot diet you actually plan to use, rather than whichever one is cheapest to unlock.
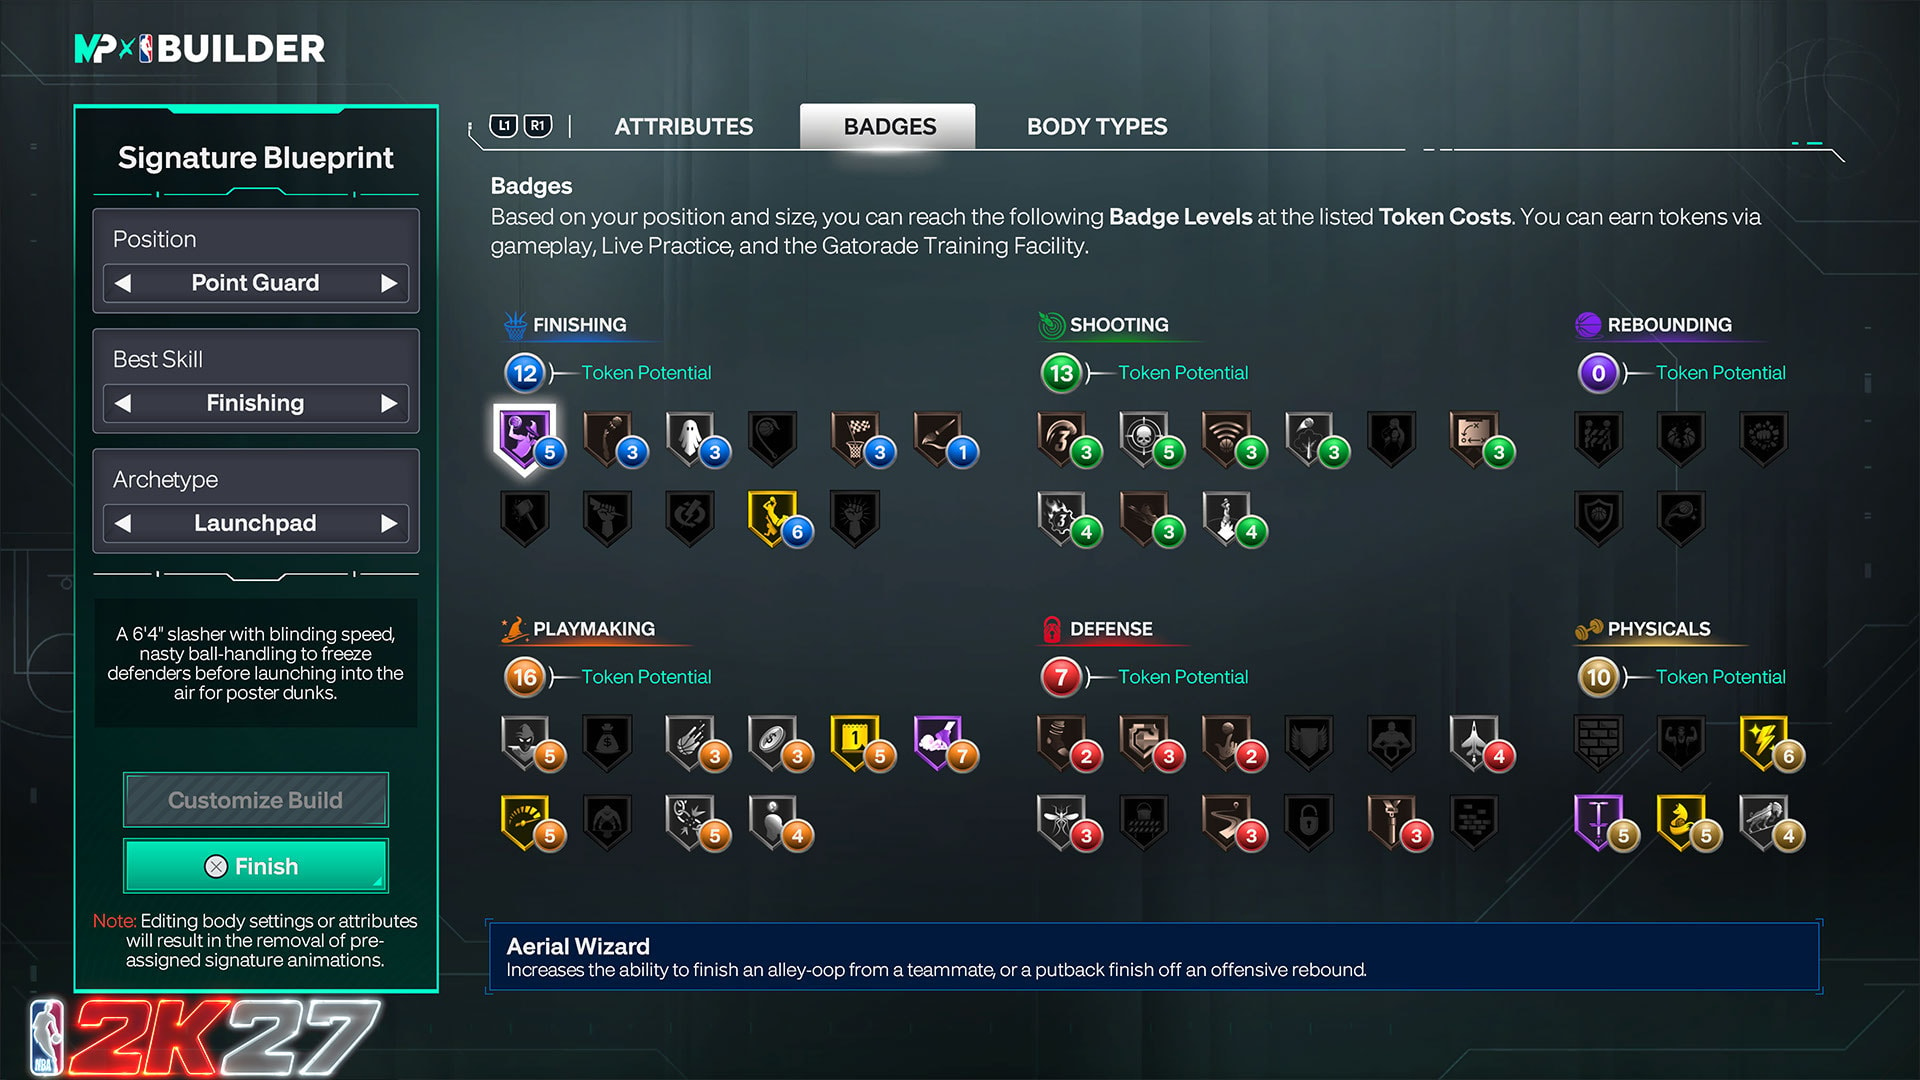
Cap Breakers are the other long-term lever: 2K describes them as rewards that let you push a MyPLAYER's attributes past its original maximum potential, earned through REP, Seasonal and Crew rewards as well as Lifetime Challenges. The Builder now lets you preview exactly how a Cap Breaker will raise a given attribute before you spend it, which removes a lot of the guesswork that came with build planning in past years. Badge Tokens, which you spend inside the Attribute Editor to unlock individual badges like Aerial Wizard or Posterizer once your attributes qualify, round out the same screen — check the Badge Cost panel before you pour points into an attribute just to see what it unlocks.
7. A Starting Setup and Quick-Tips Recap
If you're setting up NBA 2K27 for the first time this season, a sensible baseline looks like this:
- Shot Meter: on while you learn a new jumpshot, then test it off once your releases are consistent.
- Shot Timing Visual Cue: start with an earlier cue for more reaction time, move it later as your timing improves.
- Camera: default 2K Camera for full-court vision; try 2K Low if isolation and finishing feel too distant.
- Defensive Assist Strength / Boxout Assist Strength: start closer to default, then lower gradually as your own stick defense improves.
- Pro Stick Defense: keep steal attempts deliberate — Patch 2.0 made mistimed steals from lower-rated defenders more costly.
- Takeover HUD: leave it visible so you know exactly when a discipline is Warm, Hot or ready to activate.
- Builder: pick a Build Specialization that matches your actual shot diet and Takeover discipline before spending Cap Breakers.
None of these are fixed numbers you have to copy exactly — they're a starting point to adjust as Patch 2.0 and Season 2 continue to shift how shooting, defense and dunking play out. For a deeper look at how the Dunk Meter, shot contests and Takeover actually interact, see our breakdown of how the Takeover meter and its Hot/Cold zones work, and for the badge side of build planning, check our guide to the Badge Tokens and Synergy system. If you're starting a MyPLAYER from scratch, our MyCAREER Eras and MyPLAYER Builder overview covers the rest of the Builder, and our look at Season 2's new GOAT Builds and Title Update 2.0 explains what else changed in this update. You can find every other guide in our full NBA 2K27 and games walkthrough archive.
Official Resources: