Introduction
Adventure Escape: Hidden Ruins is an escape game created by Haiku Games, the creators of the Adventure Escape Series! The game has 7 chapters full of interesting clues and a wide range of puzzles. You play as Professor Burns, a man which was determined to discover the mysterious Kumari civilization that is rumored to have the key of eternal life and is looking to make his dream come true! Let’s see if you can survive the Hidden Ruins!
Walkthrough
Chapter 1
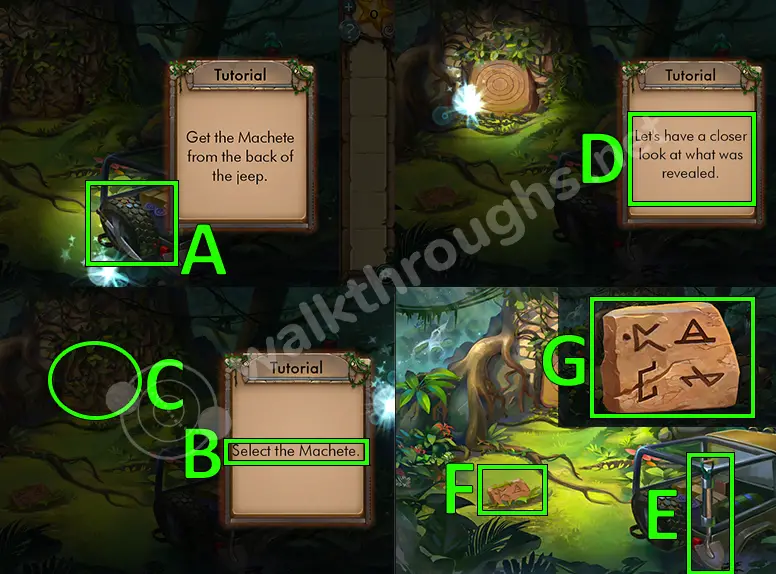
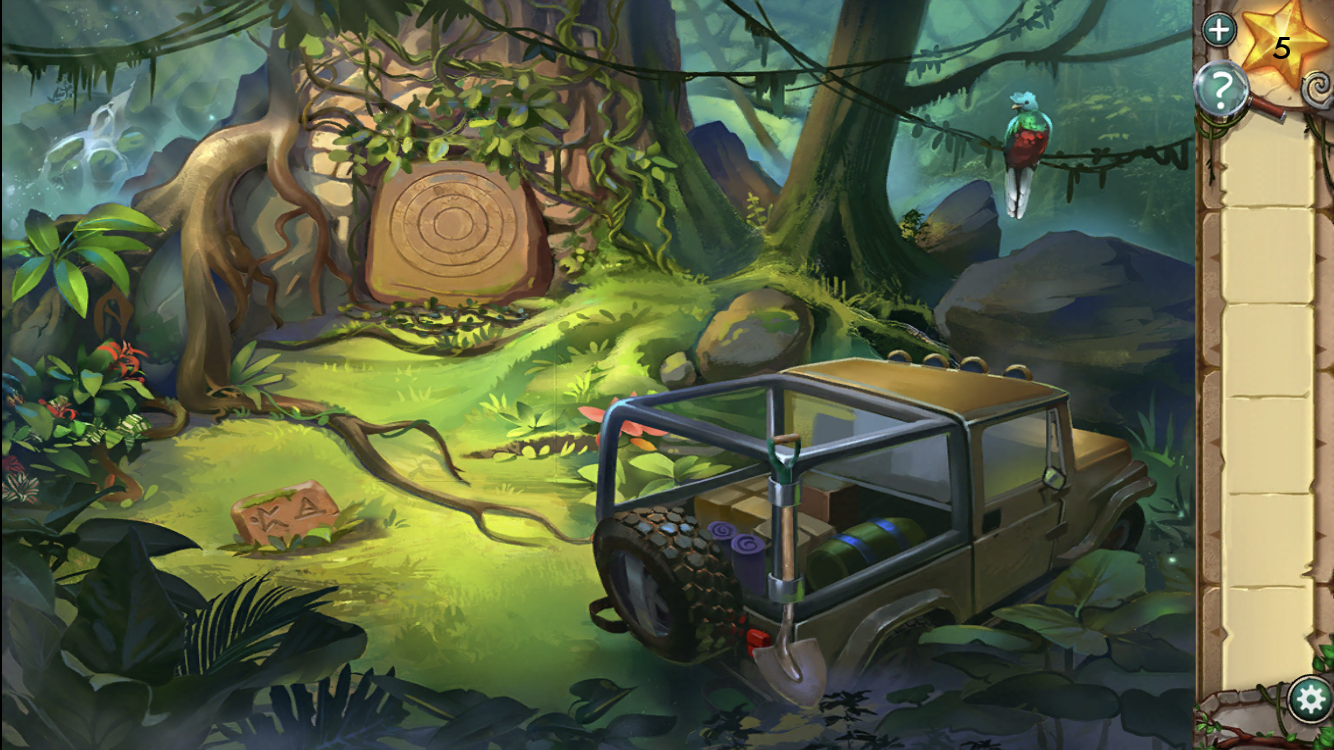
- Collect the machete from the back of the jeep. (A)
- Select the machete. (B)
- Cut the vines. (C)
- Click on the wooden stump. (D)
- Collect the shovel. (E)
- Use the shovel on the stuck tablet in the ground. Click on the tablet. (F)
- Remember the symbols from the tablet. (G)
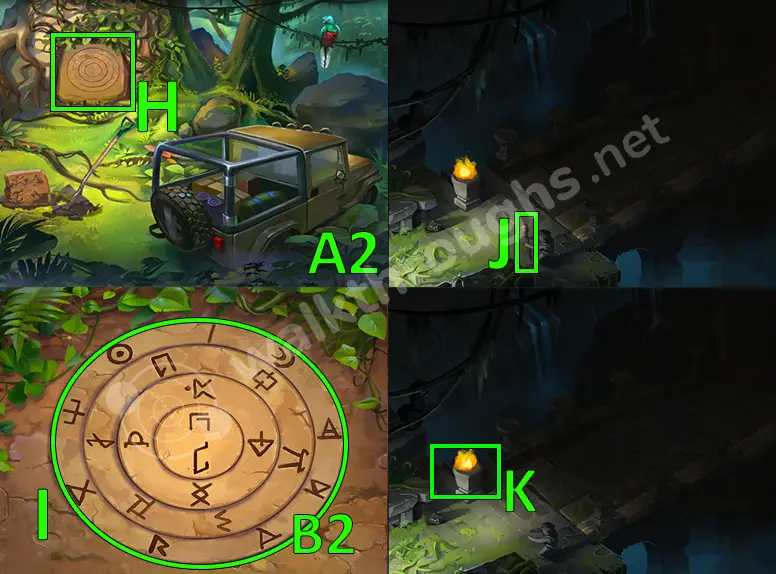
- Click on the wooden stump. (H)
- The correct way to solve the puzzle while using the tablet’s symbols. Go through the entrance that you have just opened. (I)
- Take the torch. (J)
- Lit the torch. (K)
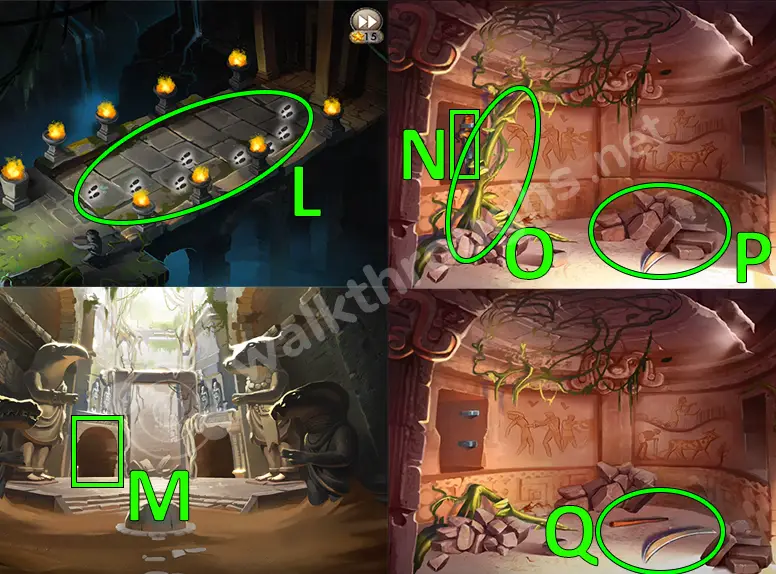
- Light up the oil lining the bridge to see through the dark. Tap the stones that are shown on the image to cross the bridge without falling. (L)
- Click on the left doorway. (M)
- Collect the dagger. (N)
- Use the dagger to cut off the vines. Pick up the vines. (O)
- Move the piles of rubble. Two parts of a scythe will appear. (P)
- Use the vine to combine them in order to fix the scythe. (Q)
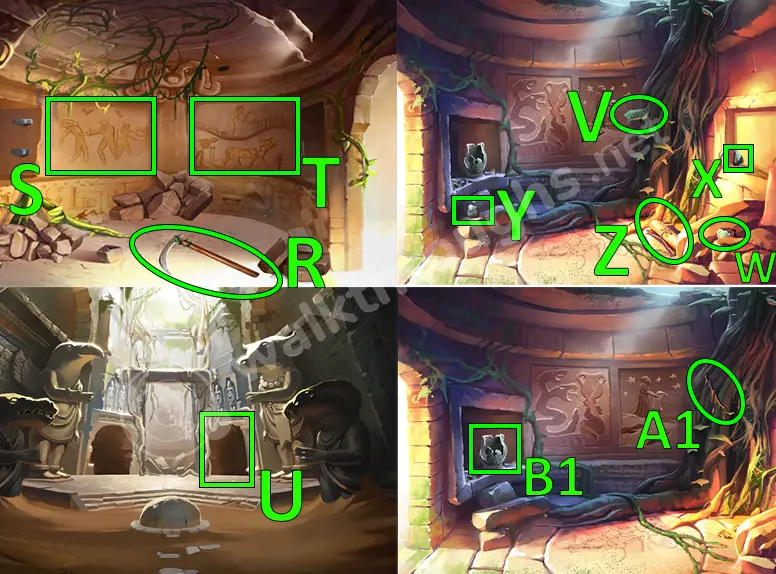
- Click on the first drawing on the wall. (S)
- Click on the second drawing on the wall. (T)
- Collect the fixed scythe. (R)
- Click on the right doorway. (U)
- Pick up the leaf. (V)
- Collect the first pottery shard. (W)
- Collect the second pottery shard. (X)
- Collect the third pottery shard. (Y)
- Collect the scroll. (Z)
- Use the dagger to cut a slit in the vines. Collect some sap from the vines with your leaf. (A1)
- Click on the pot. (B1)
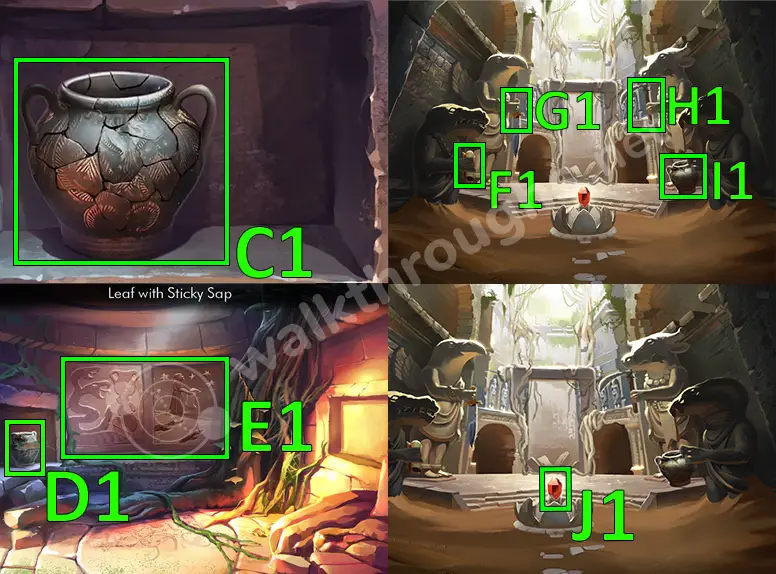
- Put the pot back together. (C1)
- Glue the pot with the leaf containing the sticky sap. (D1)
- Click on the drawings on the wall. (E1)
- Give the scroll to the Crocodile Statue. (F1)
- Give the ceremonial dagger to the Hawk Statue. (G1)
- Give the scythe to the Ox Statue. (H1)
- Give the pot to the Snake Statue. (I1)
- Take the Key of the Ages. (J1)
- Chapter Completed.
Chapter 2
First Part
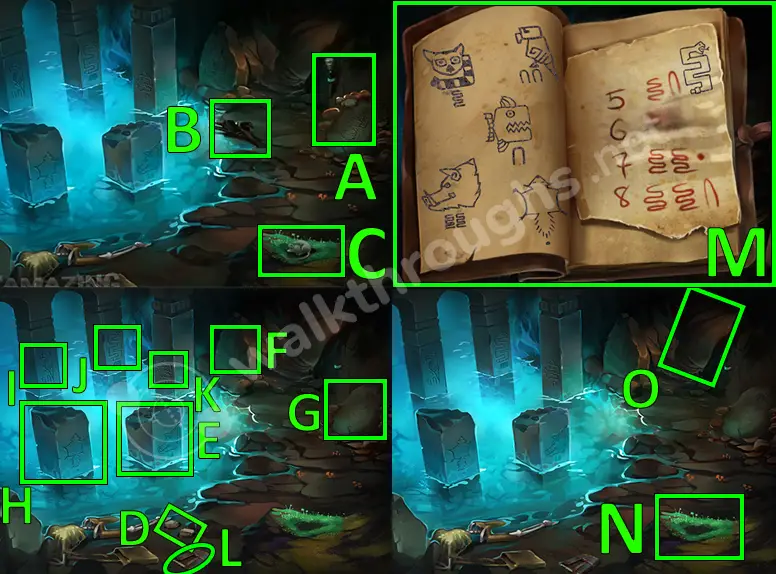
- Pick up the torch and the mushrooms. (A)
- Collect the driftwood. (B)
- Feed the mushrooms to the mouse so it leaves. (C)
- Open the corpse’s pack. Collect the flint rocks. (D)
- Take a look at the first stone. (E)
- Take a look at the second stone. (F)
- Take a look at the third stone. (G)
- Take a look at the fourth stone. (H)
- Take a look at the fifth stone. (I)
- Take a look at the sixth stone. (J)
- Take a look at the seventh stone. (K)
- Click on the book. (L)
- Read the symbols on the notebook. (M)
- Use the flint rocks on the dry moss, after that, add the driftwood and then use it to light up the torch. (N)
- Go through the entrance. (O)
Second Part
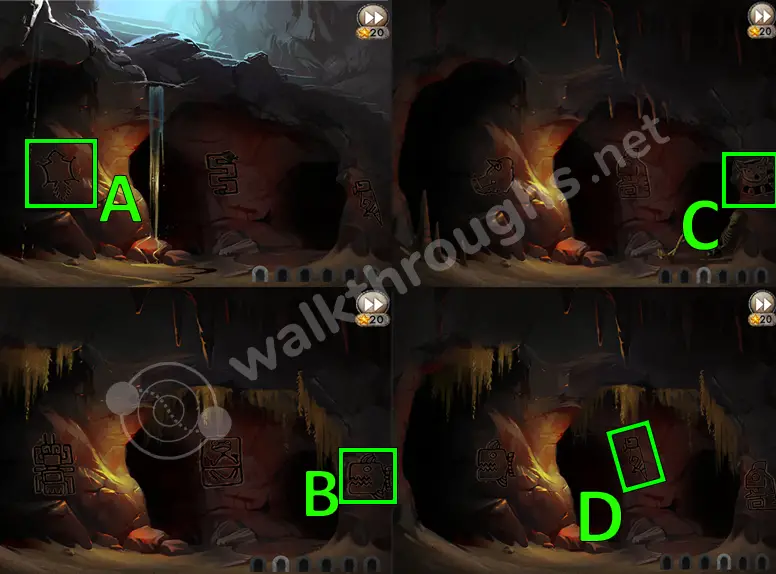
- To orientate through the cave entrances, you need to go to the correct entrances in order to get to the next phase. For the first entrance, click on the flying squirrel. (A)
- Click on the fish for the second entrance. (B)
- Click on the lemur. (C)
- Click on the parrot. (D)
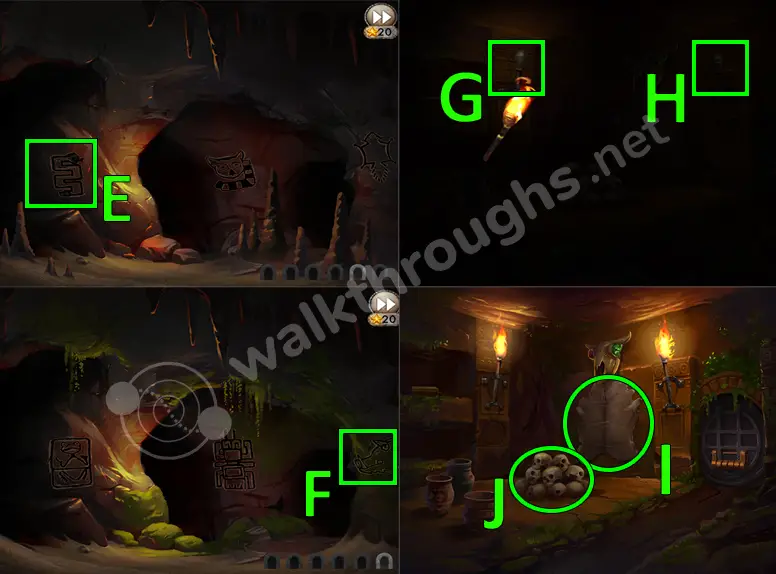
- Click on the snake. (E)
- Click on the boar. (F)
- Light the two torches in the room. (G, H)
- Take the animal skin. (I)
- Knock over the pile of skulls.(J)
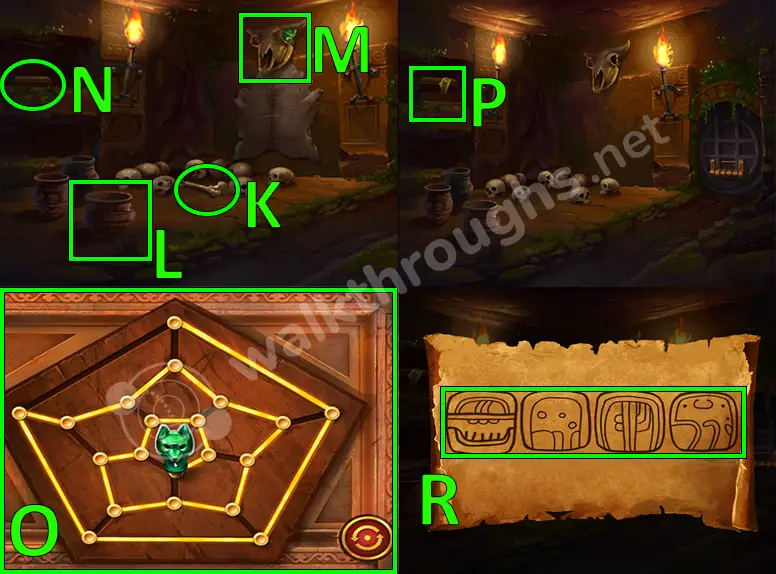
- Take the bone that was hiding in the pile of skulls. (K)
- Dip the animal skin in fish oil. (L)
- Use the greasy animal skin on the ox head. Collect the Jade Fox Head when it falls to the ground. (M)
- Use the bone to pull the box closer. Click on the box. (N)
- Put the fox head on the box. The image shows the correct way to solve the puzzle. (O)
- Collect the scroll. (P)
- Read it. It shows a hint for the next puzzle. (R)
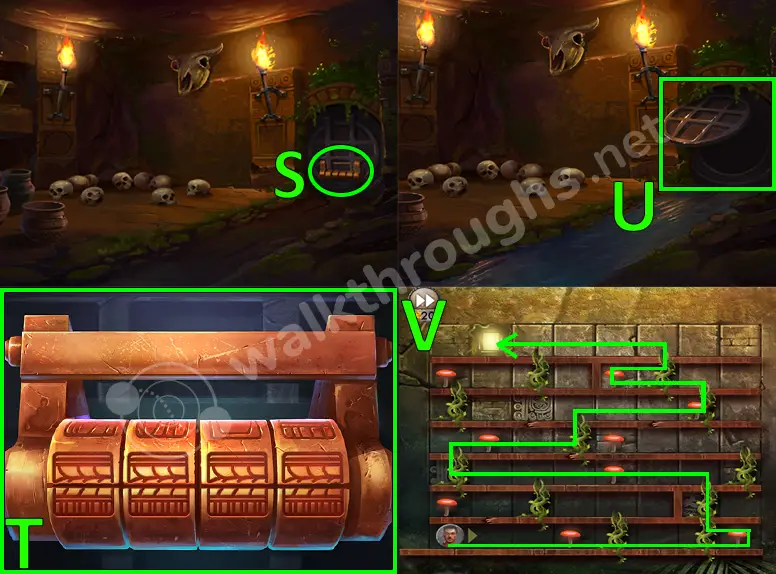
- Click on the combination lock puzzle. (S)
- Use the symbols from the scroll to solve the puzzle. (T)
- Go through the sewers. (U)
- It is time to escape two mazes in order to complete Chapter 2! The image shows the correct path to escape Maze 1. (V)
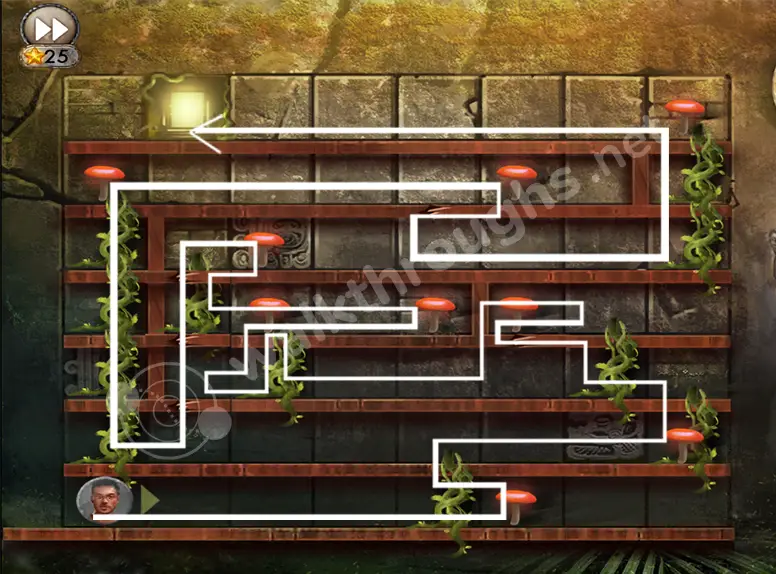
- This image shows the correct path to escape Maze 2.
- Chapter Completed.
Chapter 3
First Part
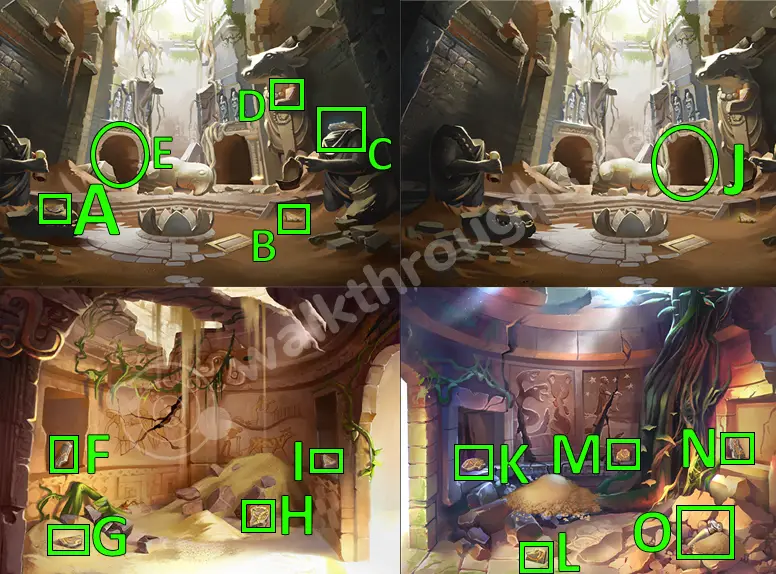
- Pick up the first fragment. (A)
- Pick up the second fragment. (B)
- Pick up the third fragment. (C)
- Collect the fourth fragment. (D)
- Go through the left doorway. (E)
- Collect the fifth fragment. (F)
- Collect the sixth fragment. (G)
- Collect the seventh fragment. (H)
- Collect the eighth fragment. (I)
- Go through the right doorway. (J)
- Collect the ninth fragment. (K)
- Collect the tenth fragment. (L)
- Collect the eleventh fragment. (M)
- Collect the twelfth fragment. (N)
- Pick up the hawk jar. (O)
Second Part
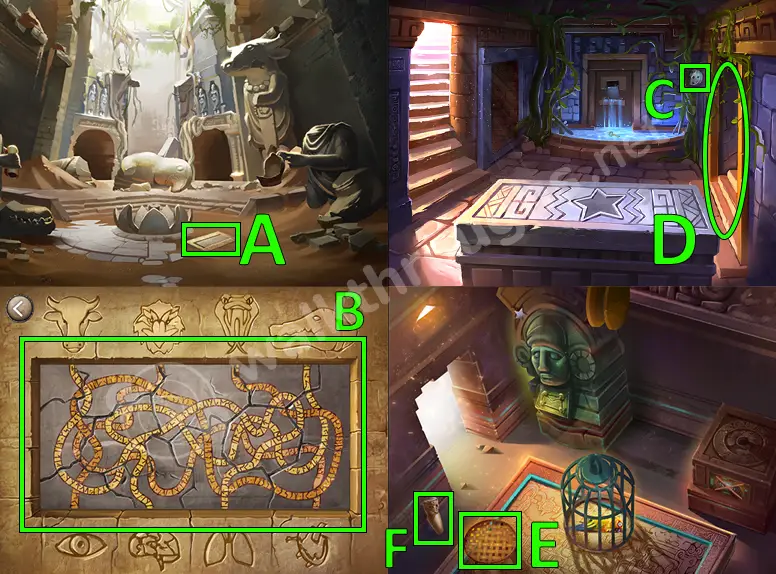
- Tap on the stone plaque. (A)
- Piece the fragments you just collected together. You can also rotate the fragments if you can’t seem to find the correct way to piece them. The image shows how to piece the fragments together. After that, go down the stairs open up. (B)
- Collect the gear. (C)
- Go through the door. (D)
- Collect the sieve. (E)
- Collect the snake jar. (F)
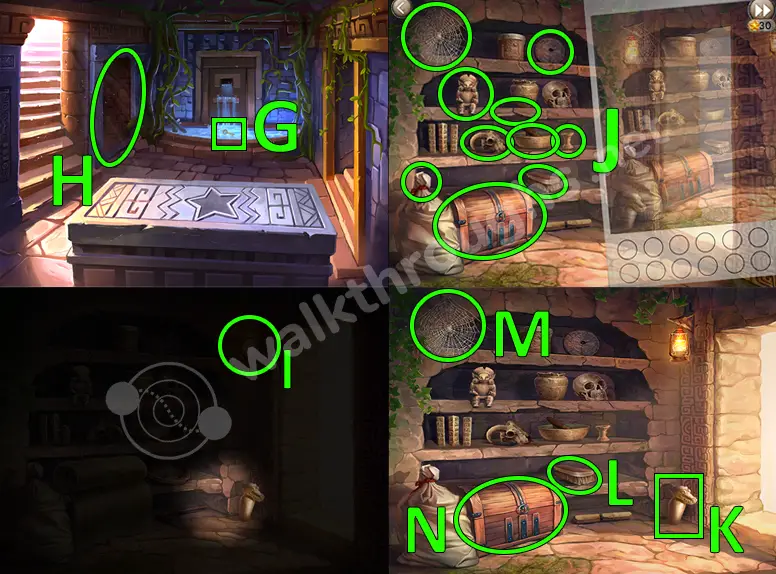
- Use the sieve to get the key from the fountain. (G)
- Head through the door on the left. (H)
- Aim at the lamp to turn the lights on. (I)
- Tap all the things in the photo that are different. (J)
- After that, take the snake jar. (K)
- Take the brush. (L)
- Take the cobweb. (M)
- Use the key that you found on the fountain to open the chest. Collect the rope inside the chest. (N)
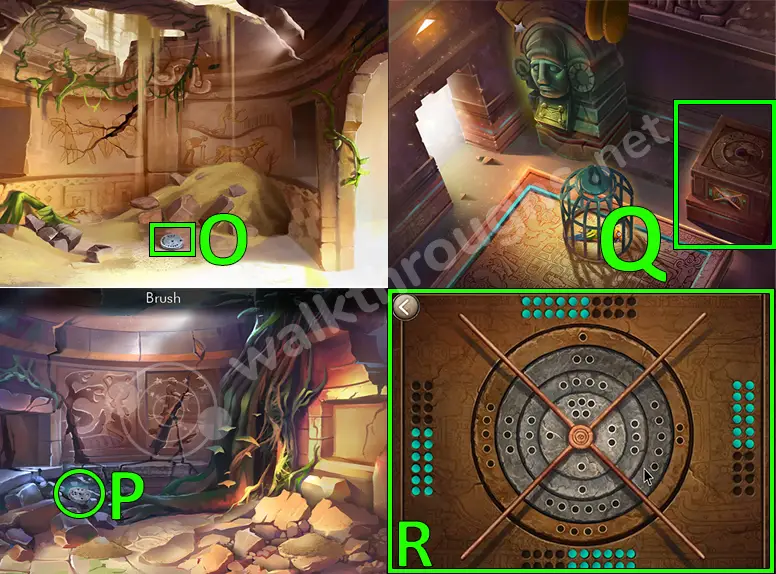
- Collect the second gear. (O)
- Go through the right doorway. Collect the third gear. (P)
- Go downstairs again and then go through the left door. Click on the lever mechanism. (Q)
- Place all the gears on the lever mechanism. The image shows the correct way to solve the puzzle. (R)
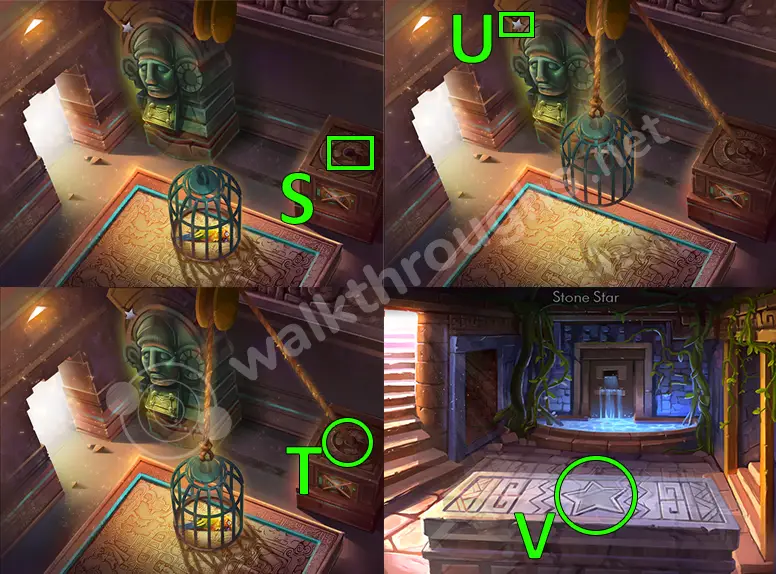
- Connect the rope with the lever mechanism. (S)
- The cage will lift up. Use the cobweb on the bird to stop the bleeding. Collect the bird, it will be named Bart. (T)
- Select the bird called Bert on your inventory and click on the star to make the bird collect the star and give it to you. (U)
- Place the star on stonephagus. (V)
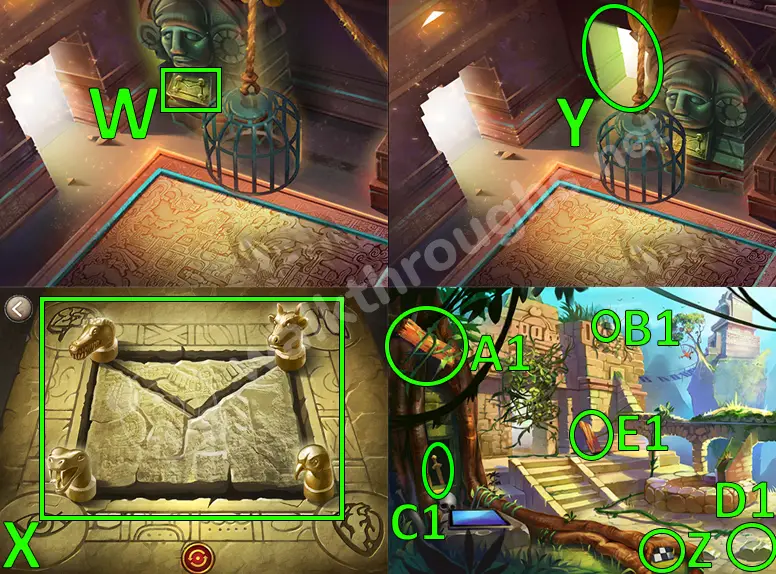
- Click on the puzzle. (W)
- Look at the plaque again to see the path from each animal to an organ or body part. The ox goes to the lungs, the Hawk goes to the heart, the Snake goes to the eye and the Crocodile goes to the brain. (X)
- Go through the entrance. (Y)
- Collect the checkered piece. (Z)
- Use Bert to reach the vine. Collect the plank that drops. (A1)
- Use Bert to reach the checkered piece. (B1)
- Collect the sword. (C1)
- Move the sword and collect the checkered piece. (D1)
- Collect the wooden plank. (E1)
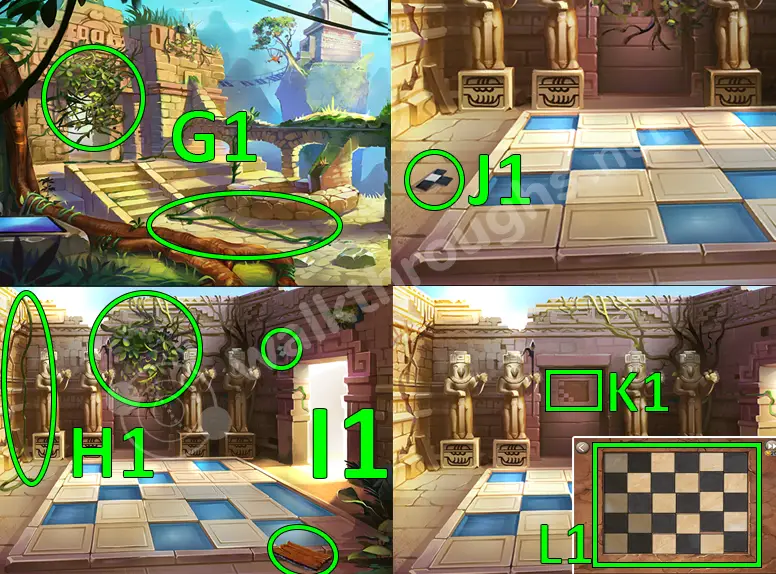
- Use the sword on the two vines. Collect the two vines. Go through the arched doorway. (G1)
- Use the sword to get two more vines. (H1)
- Collect the wooden plank and the checkered piece. (I1)
- Collect the checkered piece that was hiding under the vine. (J1)
- Click on the puzzle. (K1)
- Add all the checkered piece to the puzzle. The end result should look like a checkerboard in order to solve it. (L1)
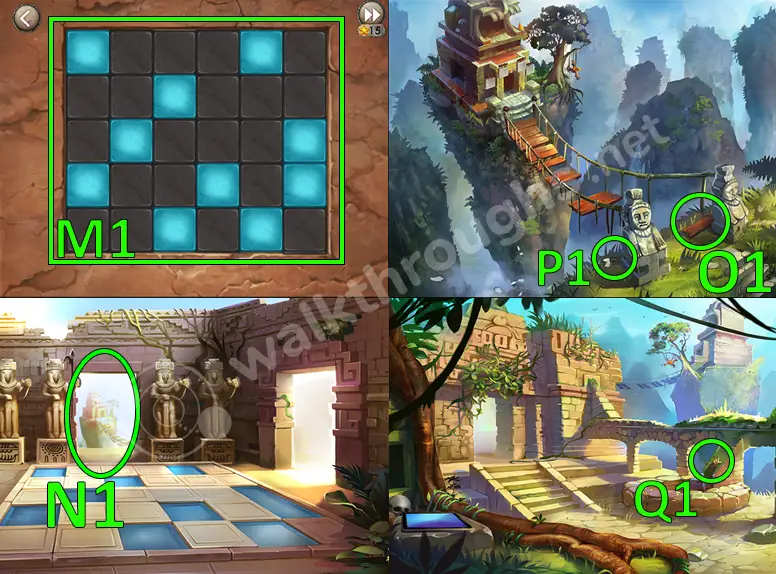
- Click on the buttons shown on the image. The puzzle is based on the blue blocks in the pool. (M1)
- Go through the doorway. (N1)
- Collect the wooden plank. (O1)
- Collect the bird talon. (P1)
- Use the bird talon in the object stuck in the well. Collect the final plank. (Q1)
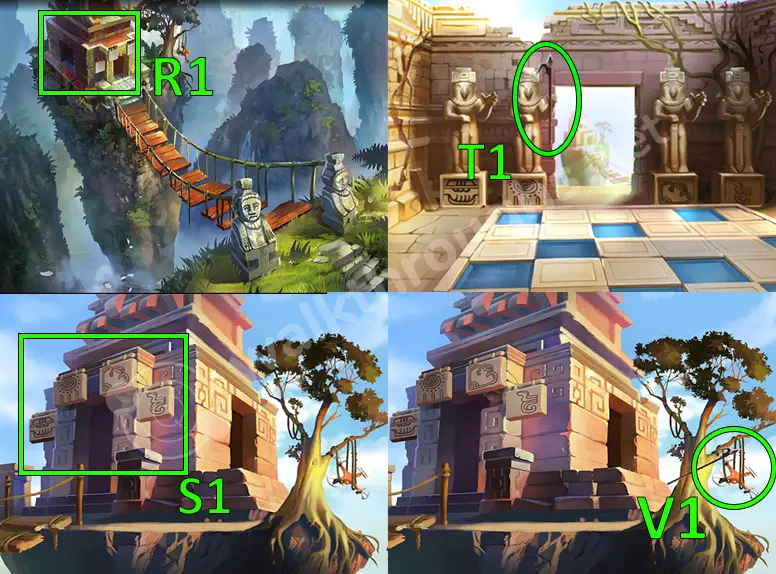
- Rebuild with the bridge with the planks and vines you just collected. Go to the tower. (R1)
- Remember the symbols that are hanging from the shrine.
- Go to the statue room. Change the symbols under the statues to match the symbols hanging from the shrine. Collect the spear. (T1)
- Use the spear to get the drone and the computer chips. (V1)
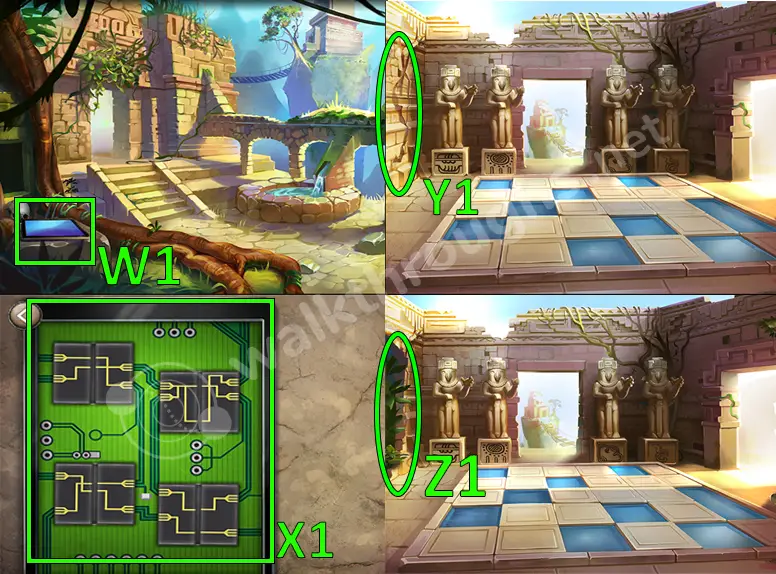
- Go back to the beginning place and click on the tablet. (W1)
- The image shows the correct slots in order to fix the drone tablet. (X1)
- Go to the statue room and blow up the wall with the drone. (Y1)
- Go through the broken wall. (Z1)
- Chapter Completed.
Chapter 4
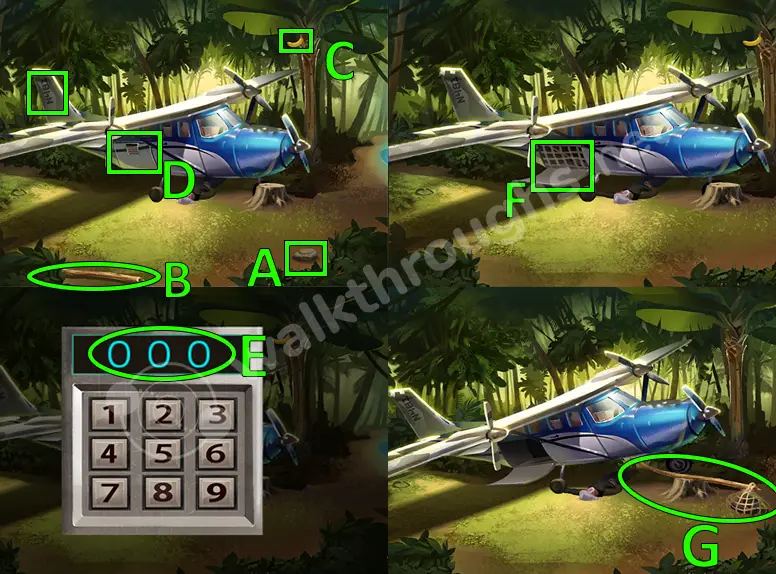
- Collect the rock. (A)
- Collect the fallen tree branch. (B)
- Use Bert to get the banana from the tree. (C)
- Read the numbers on the plane’s tail, it says N481. Click on the keypad located on the plane. (D)
- Use the plane tail’s numbers on the keypad, 481. Now the cargo bay is opened. (E)
- Collect the cargo net and the fishing rod inside the cargo bay. (F)
- Place the tree branch on the stump. Then go right. (G)
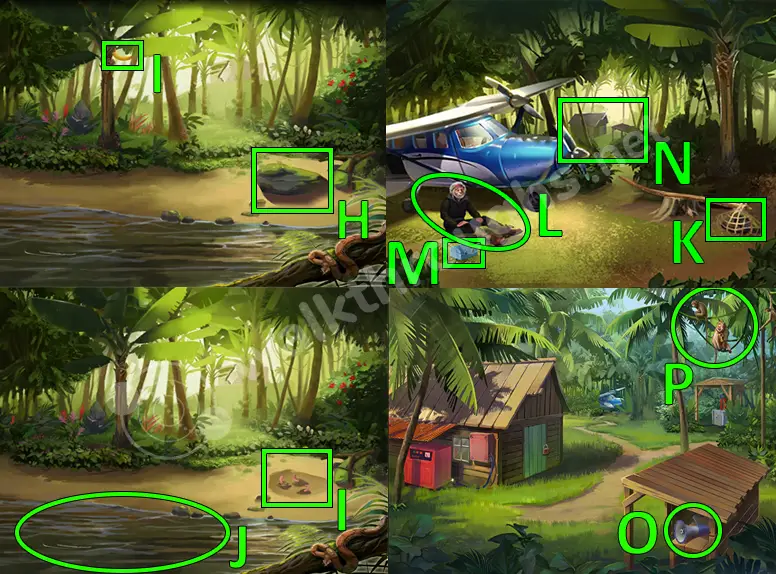
- Collect the rock. (H)
- Collect the banana. (I)
- Use the fishing rod with the worms that were under the rock. (I)
- Use the fishing rod in the water to get a fish. (J)
- Place the net on the fallen tree branch and add the two rocks inside the net to save the man trapped under the plane. (K)
- After saving the trapped man, a lunch box will appear. Give the fish to the man in exchange for a banana. (L)
- Open the lunch box, collect the banana. (M)
- Go through the trees to go to the buildings. (N)
- Collect the bullhorn. (O)
- Click on the monkeys. (P)
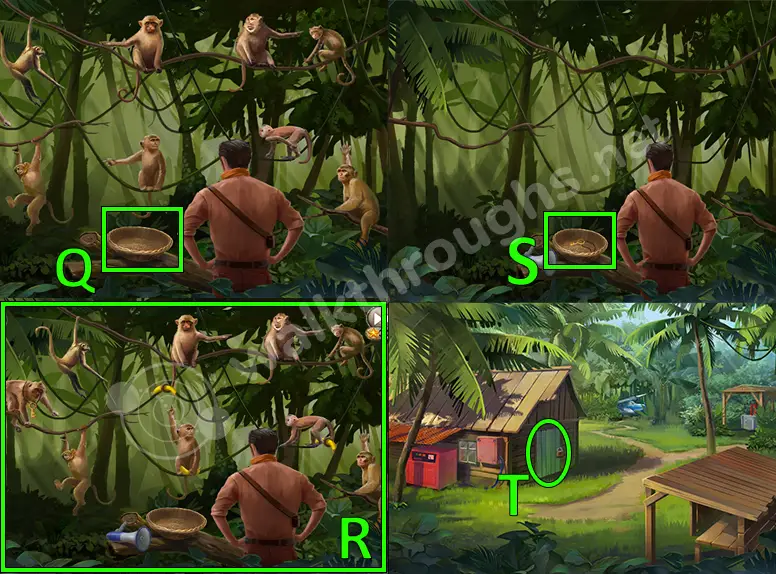
- Place the three bananas in the basket and place the bullhorn next to the basket. (Q)
- Give the correct monkeys the bananas so when the bullhorn is blow in order to make the key end up in the basket. It should look like the image below in order to solve the puzzle. (R)
- Collect the key. (S)
- Use the key to open the door. Go through it. (T)
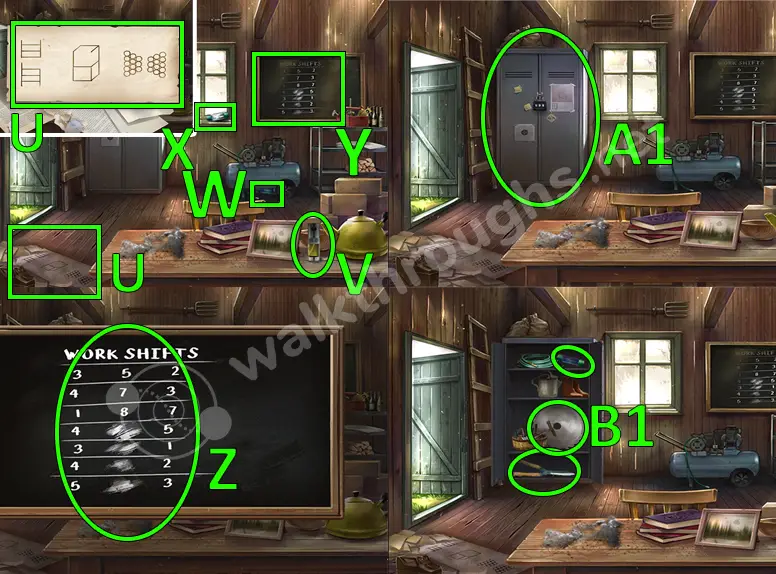
- Click on the blackboard. Fill in the lines that are missing and you will get the number 478. (U)
- Collect the oil spray. (V)
- Collect the fuse. (W)
- Collect the second fuse. (X)
- Click on the blackboard. Look at it, add up the first number and third number to find the second number. The missing second numbers are: 9, 4, 6, 8. Remember these numbers since they are going to be used for a future puzzle. (A1)
- Click on the cabinet. Use the number 478 in order to open it. (A1)
- Collect the saw blade, fuse and shears. (B1)
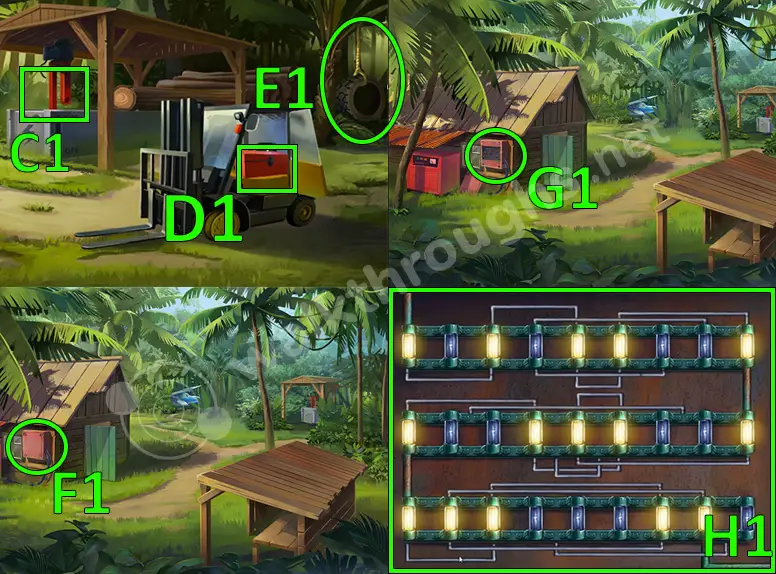
- Place the blade on the machine. (C1)
- Use the code 9468 to open the forklift. Use the oil spray to open the toolbox. Collect the screwdriver inside it. (D1)
- Use the shears to cut the rope that is holding the tire. After that, collect the tire and the rope. (E1)
- Use the screwdriver to open the fuse box. (F1)
- Click on the fuse box. (G1)
- Place the three missing fuses on the box. The image shows the correct way to move the brackets to get electricity flowing.. (H1)
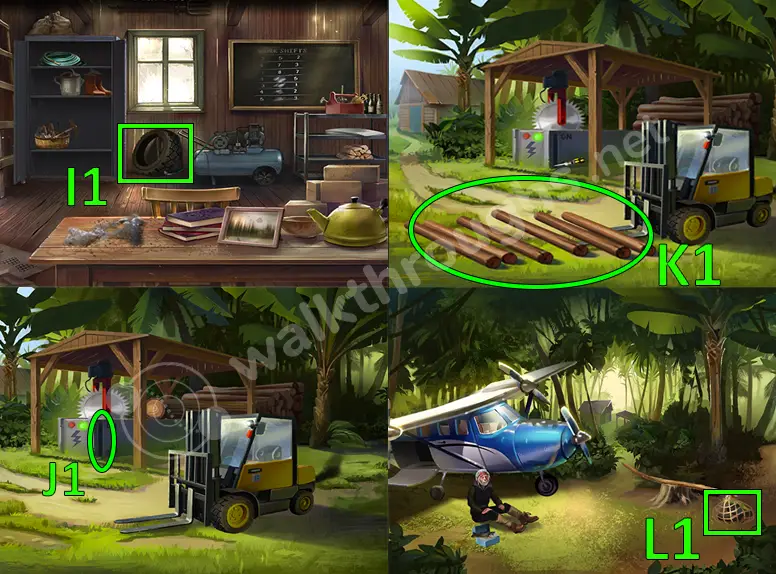
- Go inside the shed. Inflate the tire. After that, collect it. (I1)
- Use the screwdriver as a level to turn on the logger. Doing that with make the logger cut some wood. (J1)
- Use the first rope to tie them up together. We need another rope to tie them up into a raft, so lets find it. (K1)
- Go back to the plane and use the shears on the net to collect another rope. (L1)
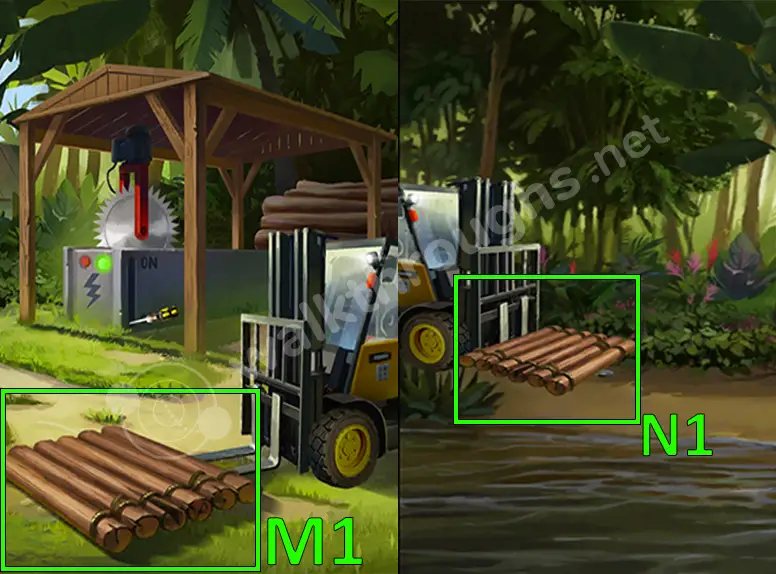
- Use the final rope to tie them up into a raft. Then place the inflated tire to the forklift to make the forklift move into the river. (M1)
- Chapter Completed. (N1)
Chapter 5
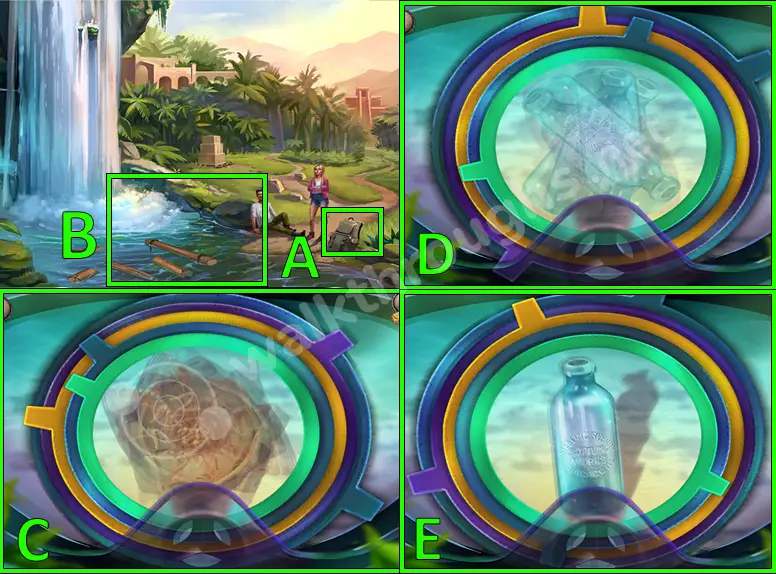
- Open the backpack. Collect the diving mask and slingshot. (A)
- Use the diving mask on the water. (B)
- Match up all the layers of the shoe. (C)
- Match up all the layers of the bottle. (D, E)
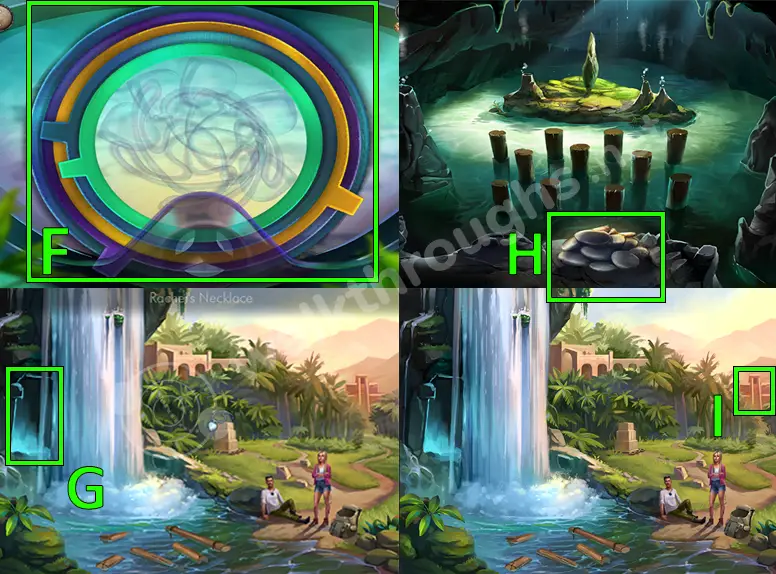
- Match up all the layers of the necklace. (F)
- Enter the cave located behind the waterfall. (G)
- Collect the pile of pebbles. (H)
- Get out of the cave and go to the temple. (I)
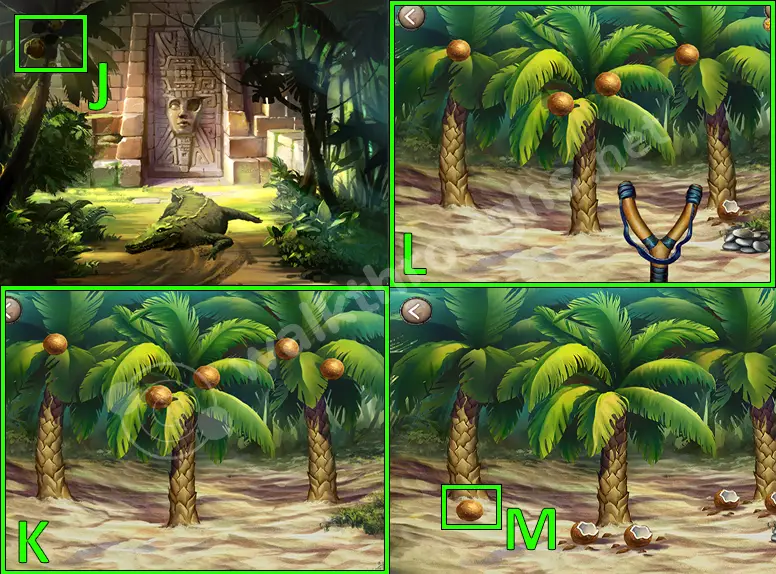
- Tap on the cocunut tree. (J)
- Place the pile of pebbles alongside the tree. (K)
- Use the slingshot and pebbles to shoot the coconuts. (L)
- Take the last coconut. (M)
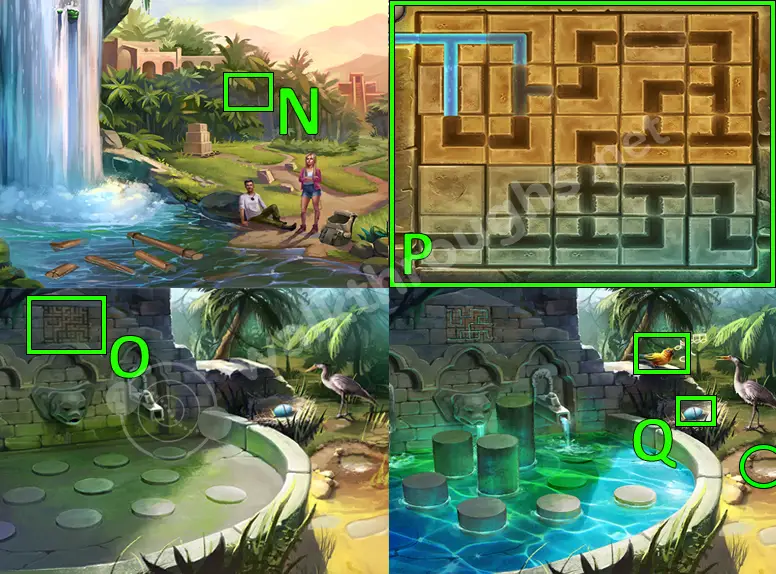
- Click on the middle of the trees. (N)
- Click on the puzzle. Stones will rise up after doing this puzzle, giving you a hint for the pegs located in the waterfall area. (O)
- The correct way to solve the puzzle. (P)
- Have Bart sing the crane to collect the egg. After Crane gets distracted, collect the blue egg. Also, pick up the puddle of mud. (Q)
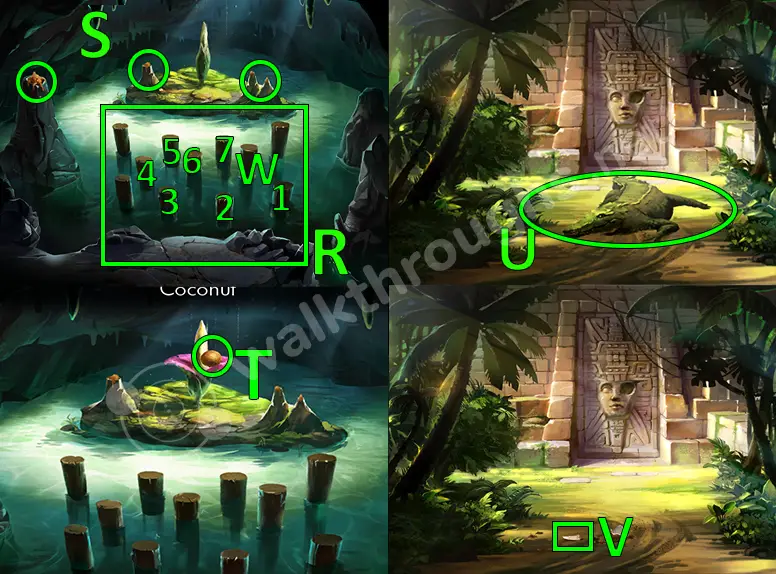
- Click on the pegs in the correct order to solve the pegs puzzle. (R)
- Stuff some mud in the spouts because after doing the puzzle, the spouts will steam. (S)
- Place the coconut into the meaty smelling flower to get a meaty smelling coconut. (T)
- Give the meaty smelling coconut to the crocodile. (U)
- Collect the crocodile tooth. (V)
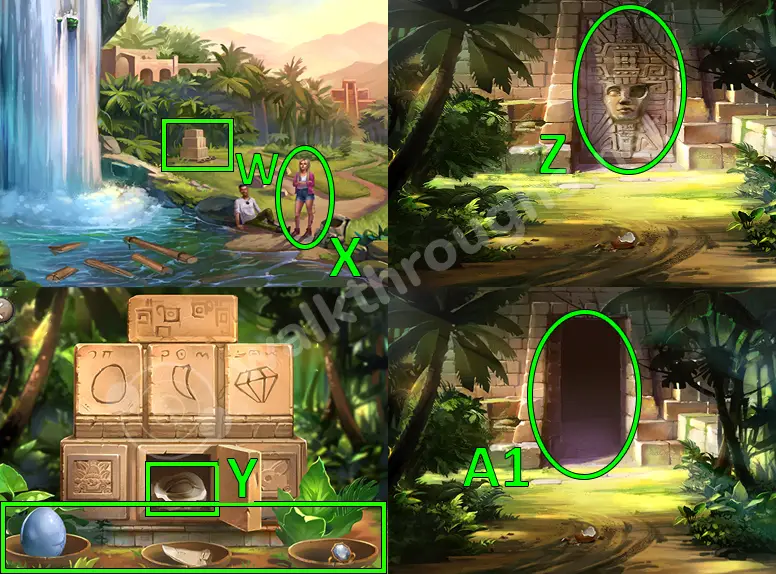
- Tap into the offering area. Place the tooth and the blue egg into the bowls, but we also need Rachel’s diamond to take the final item in order to complete this chapter. (W)
- Give the necklace to Rachel in exchange for the diamond. (X)
- Place all of the three items and take the stone eye. (Y)
- Go back to the crocodile area. Place the stone eye on the pharaoh’s eye in order to make the door open. (Z)
- Go through. Chapter Completed. (A1)
Chapter 6
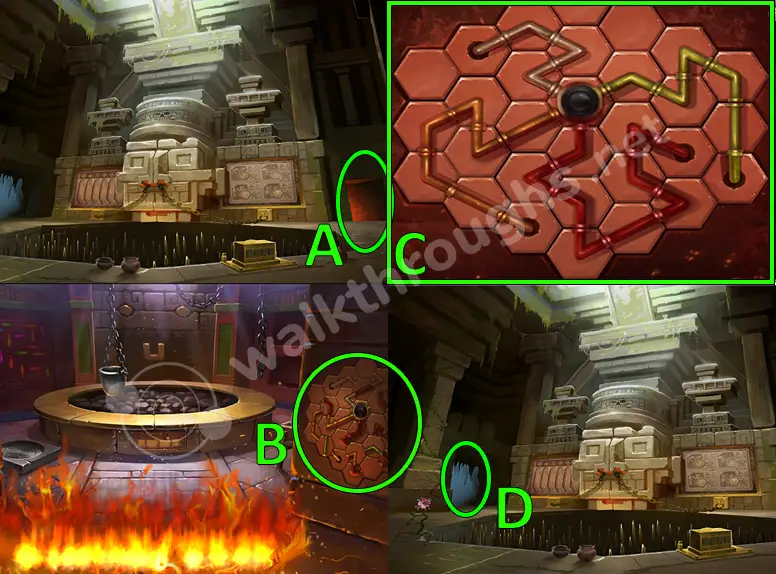
- Tap on the red doorway. (A)
- Click on the puzzle. (B)
- The correct way to solve the puzzle. (C)
- Click on the blue doorway. (D)
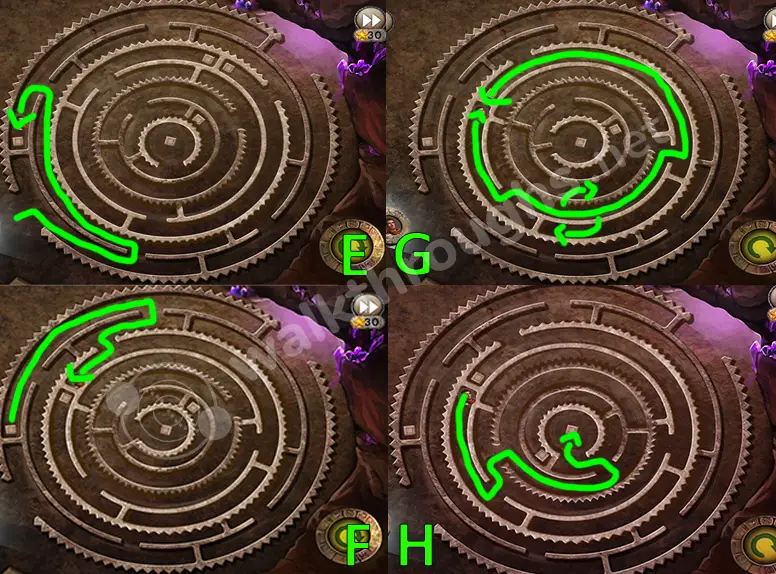
- The images show the correct path in order to progress through this maze puzzle. (E, F, G, H)
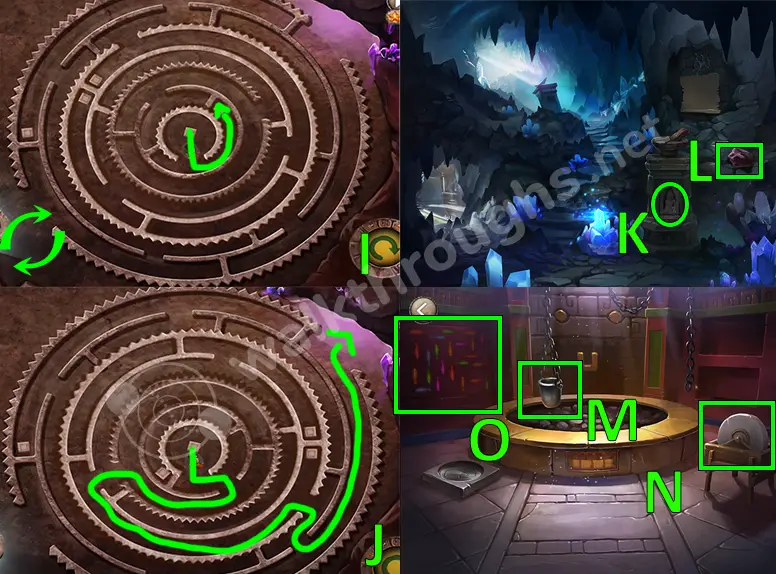
- These images show the correct final paths in order to solve the maze puzzle. (I, J)
- There is a ore hiding inside the pedestal. Collect it. (K)
- Collect the chunk of obsidian. (L)
- Place the ore into the crucible. (M)
- Use the grinding stone to sharpen the chunk of obsidian. (N)
- Click on the fish on the wall. (O)
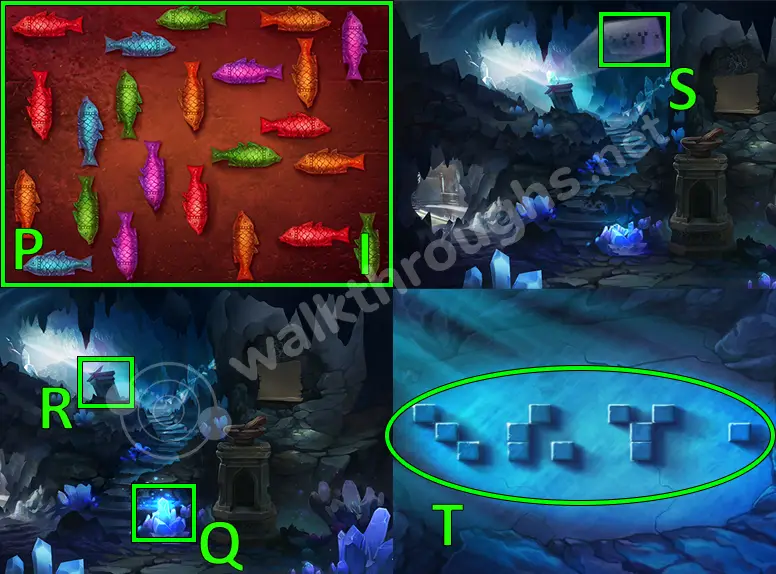
- The fish on the wall are a clue for a future puzzle. You need to figure the shape of numbers for each fish color by the direction they are facing. For the red fish, the number 5. For the yellow fish, the number 0. For the green fish, the number 9, and for the blue fish, the number 8. These numbers will be used for the next puzzle. (P)
- Go to the crystal area again. Use the sharpened obsidian to get a crystal. (Q)
- Use the crystal on the pedestal to get a clue for another puzzle. (R)
- Click on the clue. (S)
- Read the clue. It will be used for the puzzle located in the smelting room. (T)
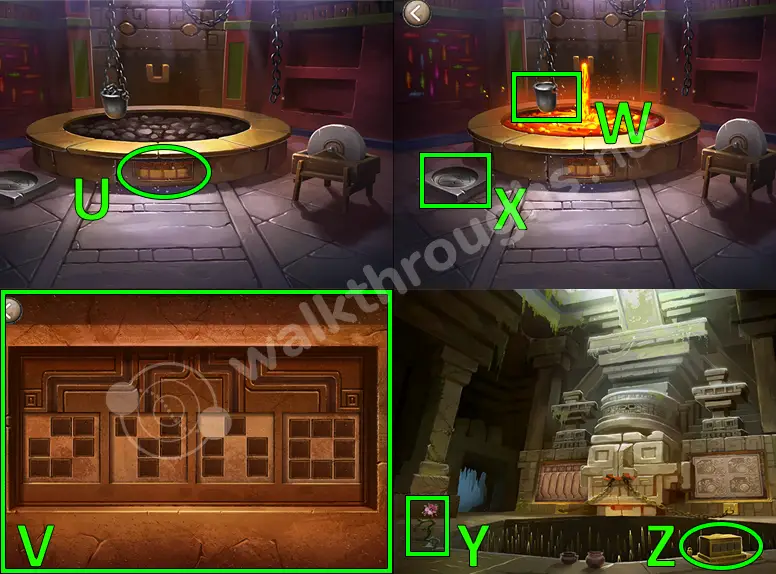
- Click on the smelting room puzzle. (U)
- Use the clue from the crystal area to solve the puzzle. (V)
- Take the melted ore. (W)
- Pour the ore into the mold on the floor. Collect the shield that gets created from it. (X)
- Collect the pink flower. (Y)
- Click on the puzzle. (Z)
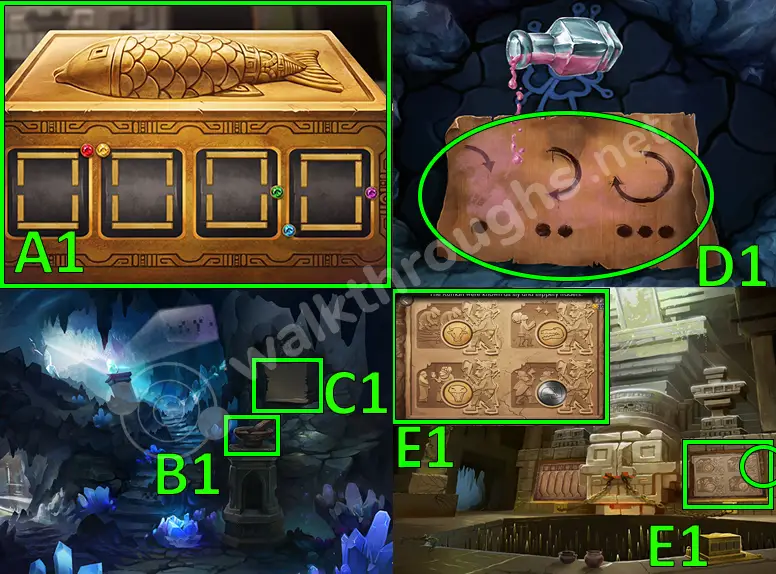
- Use the numbers from the fish on the wall to solve the puzzle. The number is 5098. Collect the stone quills. (A1)
- Place the pink flower in the mortar and pestle to create a liquid vial. (B1)
- Add liquid vial to the parchment to get a clue for a future puzzle. (C1)
- Read the clue. We are going to use this clue for a puzzle involving stone quills. The clue means that, 1 dot means one turn clockwise, 2 dots mean two turns clockwise and three dots mean three turns clockwise. (D1)
- Click on the shields. Place the new shield with the other shield. (E1)
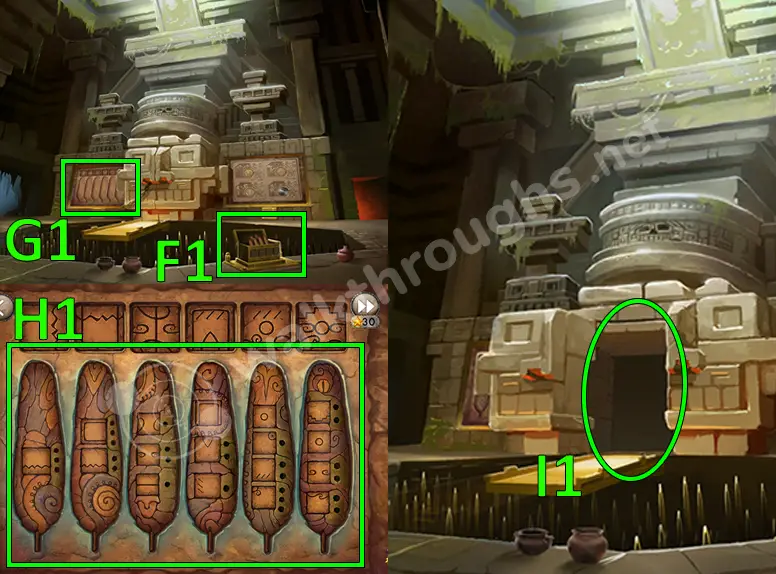
- Make sure you have collected all of the stone quills. (F1)
- Click on the stone quill puzzle. Use the clue from the parchment to solve the puzzle. (H1)
- Go through the unlocked entrance. (I1)
- Chapter Completed.
Chapter 7
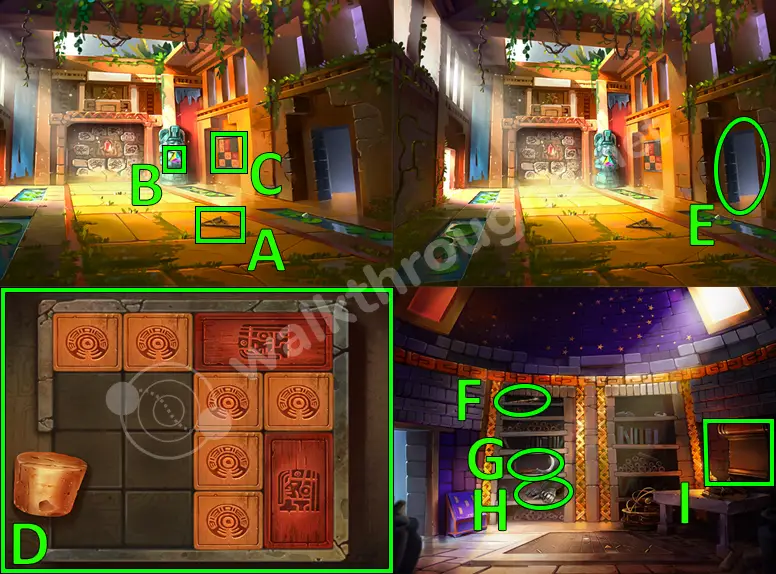
- Collect the dial from the floor. (A)
- Collect the prism. (B)
- Click on the sliding block puzzle. (C)
- Get the cork out through the opening on the left. (D)
- Go through the doorway. (E)
- Use Bert to collect the dial. (F)
- Collect the sickle. (G)
- Collect the gloves. (H)
- Click on the parchment. (I)
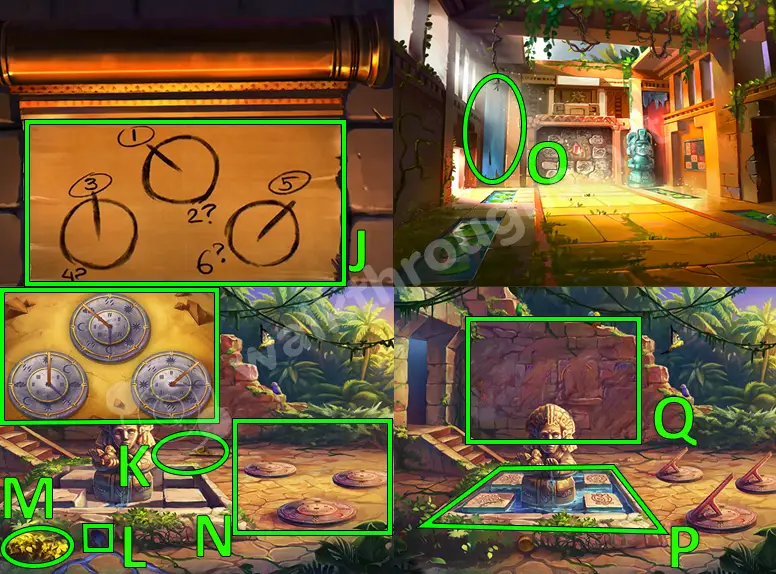
- The clue is going to be used for a future puzzle. (J)
- Collect another dial. (K)
- Use the cork to stop the water from draining. (L)
- Use the gloves on the plants to find another prism. (M)
- Place the three dials you collected on the sundials. Set the sundials so they match the clue we just found on the parchment. Collect the note after matching the sundials. (N)
- Use the sickle on the banner on the left. Collect the piece of banner. (O)
- Wet the piece of banner in the fountain. (P)
- Use the wet cloth to clean the dirty wall. Doing that, will allow you to read a hint for the next puzzle. You have 4 red symbols, 3 pink symbols, 1 orange and 6 blue symbols. Match the symbols to the ones on the walls with the ones in the fountain, and you will get the number 4613. Also there are 5 birds in the background, so remember these 5 numbers since they are going to be used for the next puzzle. (Q)
- Go through the room on the doorway on the right. (Q)
- Use the numbers 4, 6, 1, 3 and 5 to open the chest. (R)
- Collect the prism. (S)
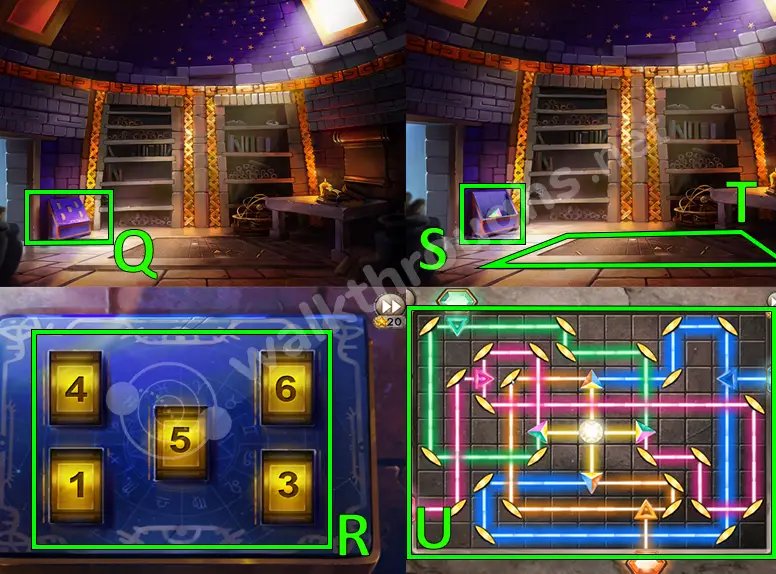
- Place the three prisms you collected on the light reflecting puzzle. After that, click on the puzzle. (T)
- The correct way to solve the puzzle. (U)
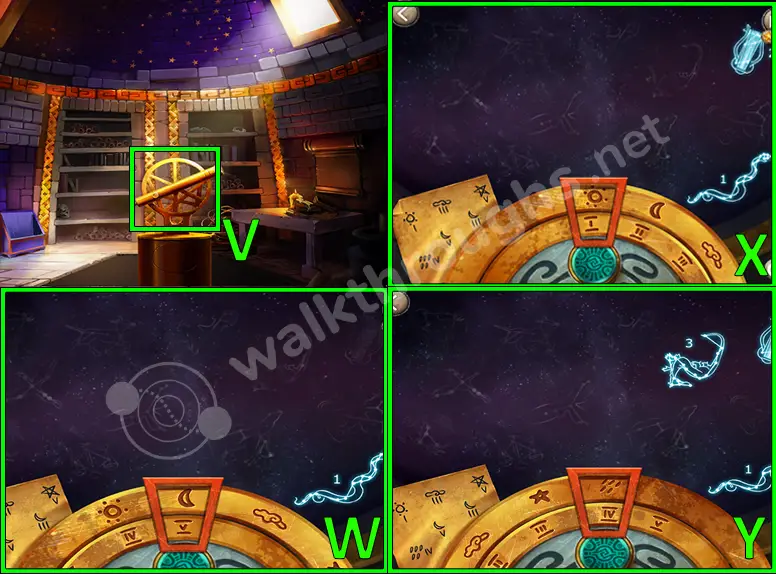
- Tap on the telescope. (V)
- Place the sundial note by the side. The image shows the first combination for the first constellation. (W)
- The image shows the second combination for the second constellation. (X)
- The image shows the third combination for the third constellation. (Y)
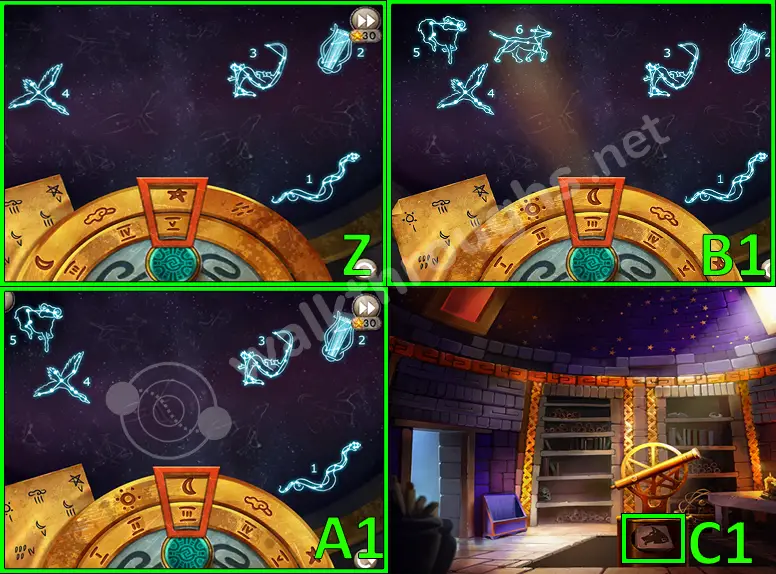
- The image shows the fourth combination for the fourth constellation. (Z)
- The image shows the fifth combination for the fifth constellation. (A1)
- The image shows the sixth combination for the sixth constellation. (B1)
- Collect the dog tile. (C1)
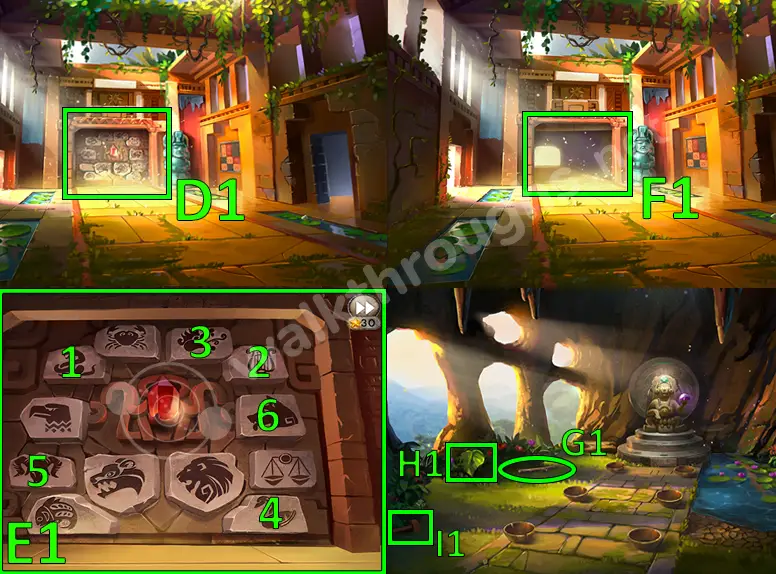
- Click on the tile wall. (D1)
- Place the dog tile with the other tiles. Click the tiles in order to open the entrance. (E1)
- Go through the entrance. (F1)
- Collect the stick. (G1)
- Collect the leaf. (H1)
- Collect the mallet. (I1)
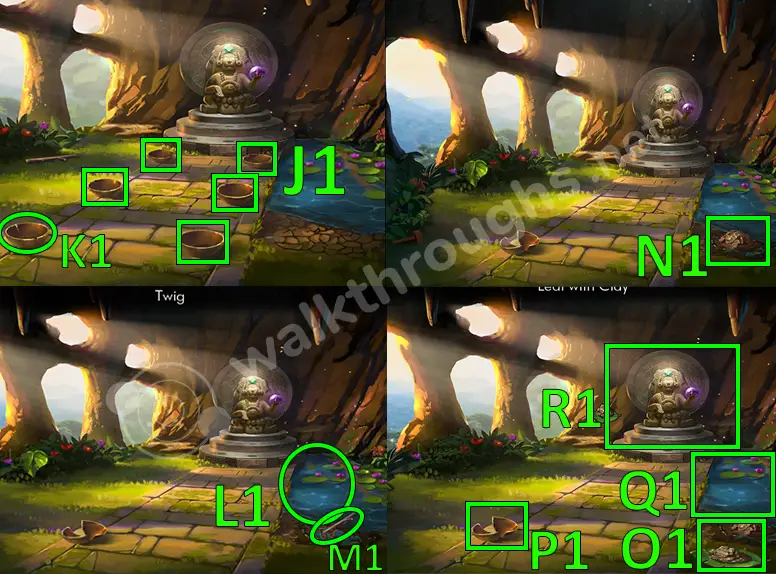
- Collect the five bowls. (J1)
- Click on the last bowl. That one breaks. (K1)
- Collect some water on one of your bowls, then pour it into the dirt. (L1)
- After that, use the stick to mix it up into clay. (M1)
- Use the leaf to collect some of the clay. (N1)
- Collect the leaf holding clay. (O1)
- Use the leaf holding clay in the broken bowl to fix it. Collect the bowl. (P1)
- Fill every bowl with water. You should have 6 bowls with water. (Q1)
- Click on the statue. (R1)
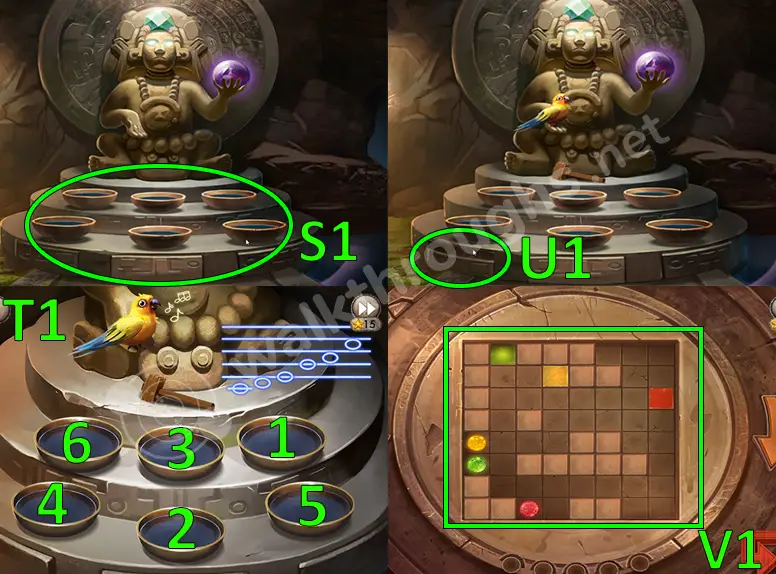
- Place the bowls on the statue. (S1)
- Place the Mallet and Bert in the statue to have him sing a tune. Hit the bowls with your mallet in the correct order as shown on the image. (T1)
- Use the stick to open the panel. (U1)
- To solve this puzzle. You need to turn the board in order to have the balls land in the correct matching squares. The five moves are: Right, Right, Right, Left, Left. (V1)
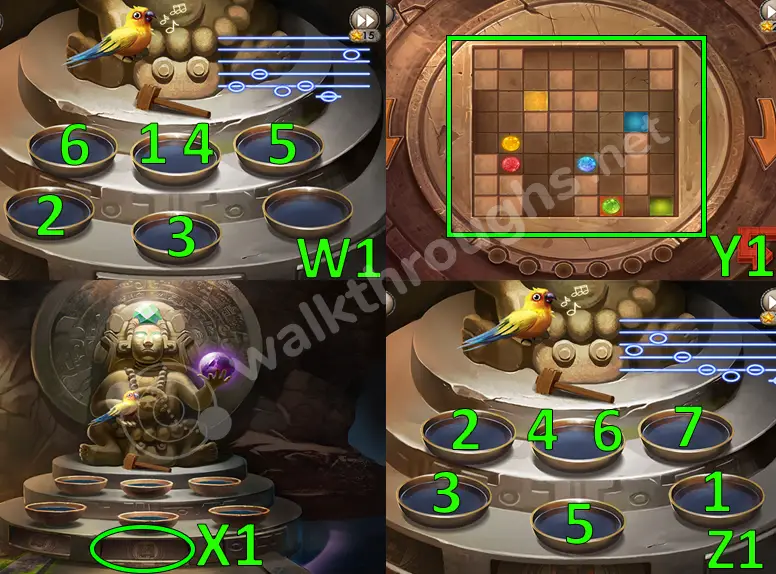
- Have Bert sing another one. Hit the bowls with the mallet in the correct order. (W1)
- Click on the puzzle. (X1)
- The moves in order to solve the second puzzle are: Right, Right, Right, Right, Right, Left. (Y1)
- Have Bert sing the third and final tune. Lastly, hit the bowls with the mallet in the correct order. (Z1)
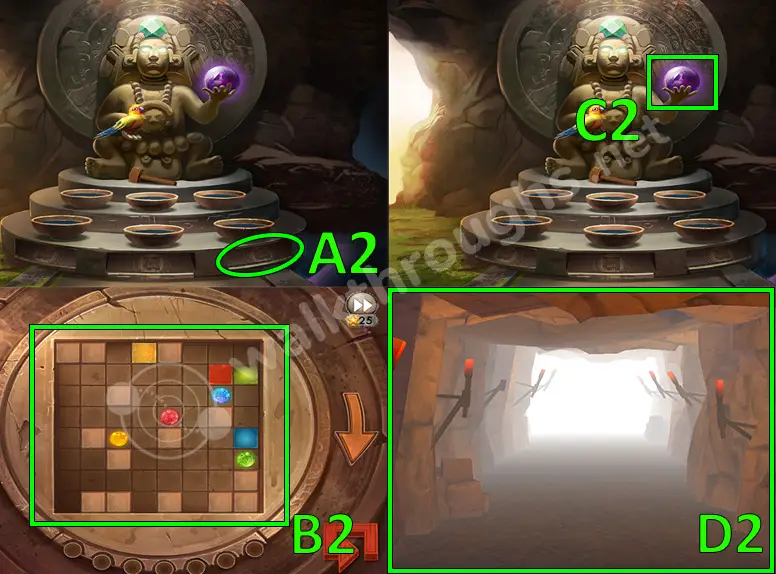
- Click on the third and final panel. (A2)
- The moves in order to solve the final puzzle are: Left, Right, Right, Right, Left. (B2)
- Collect the Elixir of Life. (C2)
- The cave is getting destroyed, so you have to escape. Swipe left and right to avoid the stalactites. (D2)
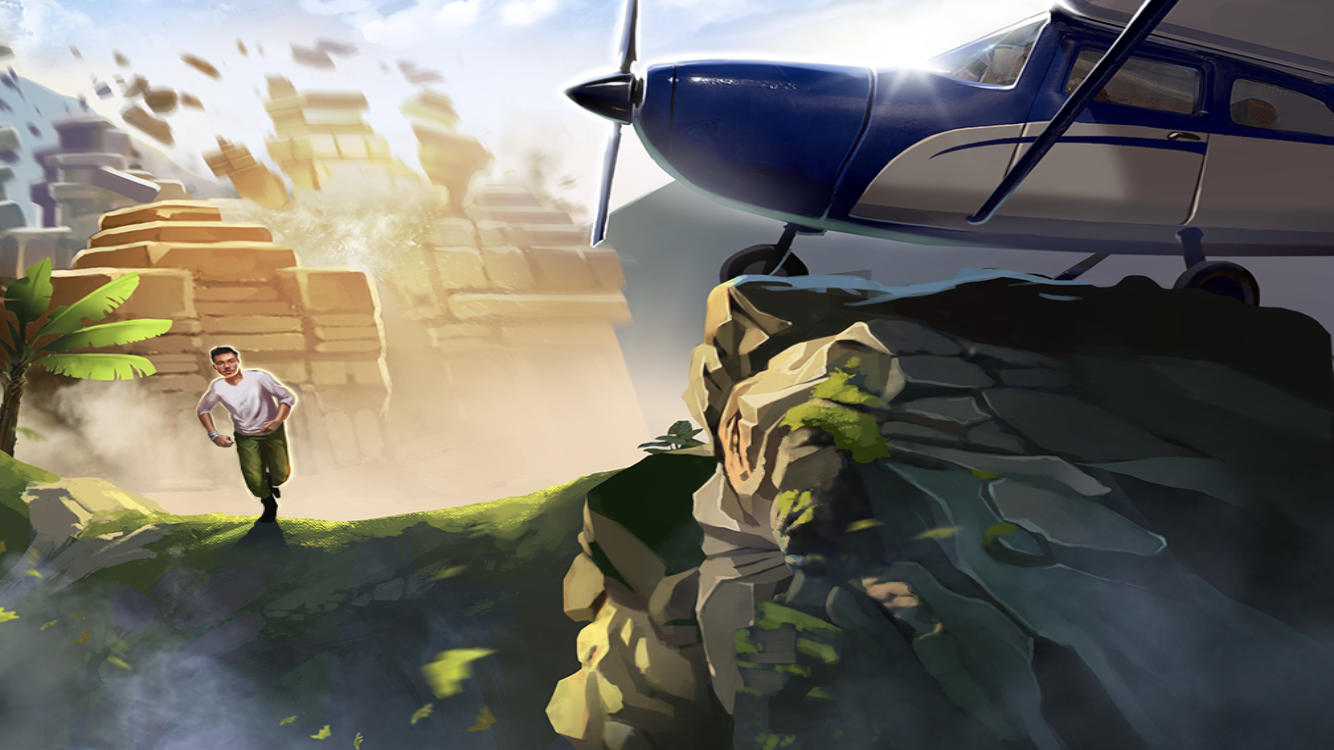
- Congrats, You completed the game!
Conclusion
Haiku Games always make escape games that are worth playing, and this is one of them! The jungle environment, the beautiful graphics and the massive amount of puzzles and riddles make it one of the best in the Adventure Escape Franchise. The beautiful ancient civilization art style, the story and the characters make it one of the best quality escape games in the market right now! You shouldn’t miss out on this one if you are looking for escape games to play!

 CodyCross Answers
 Daily Themed Crossword Answers
 Top 7 Answers
 Word Craze Answers